Hobo SEO Dashboard is a Google Sheets tool that helps marketers, SEOs, and website developers perform an SEO audit report on any website.
SEO Dashboard will autonomously run regular reports on every client in your Search Console according to the schedule you set.
When set up, you can rely on it to automatically publish and then manage updating SEO audit reports for every client in your Search Console account.
Hobo SEO Dashboard uses 4 Google APIs to run in Google Sheets (for setup):
- Google Search Console API
- Google Pagespeed API
- Google Drive API
- Google Docs API
When you go through the setup procedure, make sure all APIs are set up (all are listed in the video above, although adding Google Drive API and Google Docs API is missing from the video).
Ensure all 4 Google APIs are set up to run properly.
Follow the rest of this guide to get Hobo SEO Dashboard started.
Make a copy of your master sheet of SEO Dashboard
Set up Google APIs to work with SEO Dashboard
Hobo SEO Dashboard is designed to work within Google’s free API limits, even on a personal Gmail account. It was developed on a free account and still is. It takes moments to set up.
Set up your Google APIs first, after copying the Master Sheet which was shared with you.
It only takes a few minutes for you to set up Hobo SEO Dashboard in Google Sheets and you can start navigating your Search Console clients.
Add Google Pagespeed testing and SEO tools
Select and navigate clients in SEO Dashboard
Winners and Losers reports for keywords and URLs
Publish SEO audit reports
How to set up Search Console API
Useful link
- Your Google Cloud Dashboard.
Set up a new project in the Google Cloud console using a Personal Gmail account and free API allowance.
This is more than enough to generate these reports.
NOTE: This post presumes you have not set up any projects in Google Cloud.
How to Set Up Hobo SC (Search Console in Google Sheets) using a Personal Gmail Account
Set up a new project in Google Cloud console in a few moments.
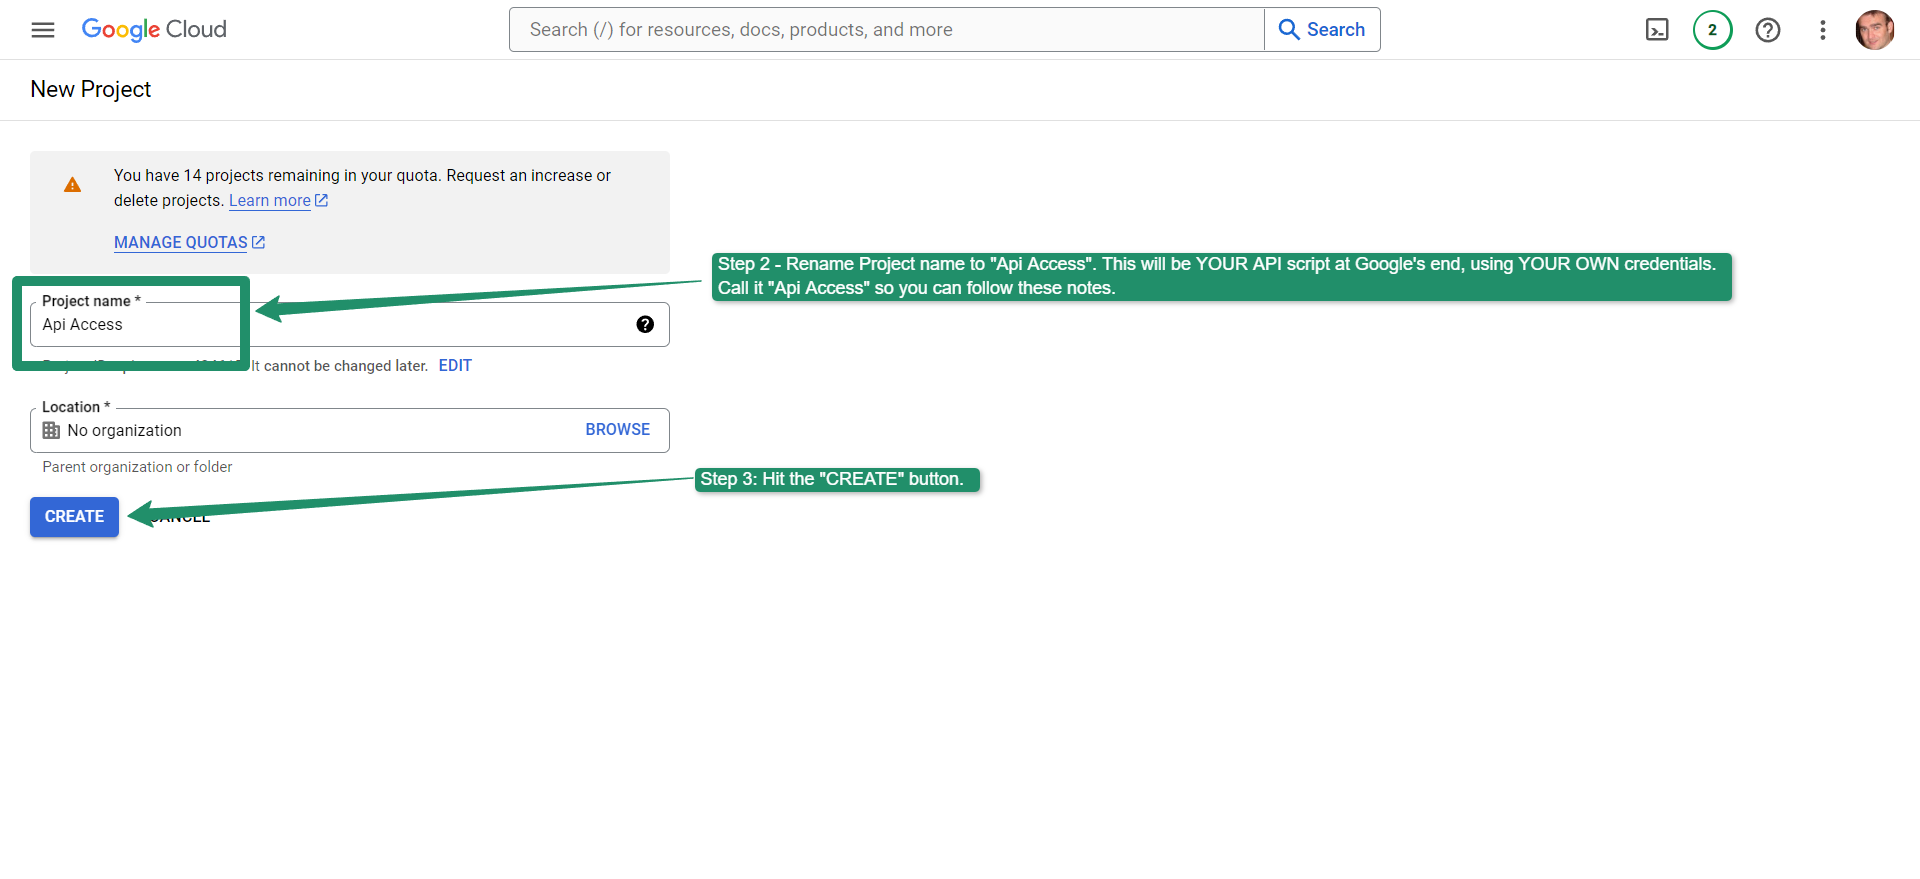
Step 1-3
- Go to your Google Cloud Console to create a new project:
- Name the project to “Api Access”. This will be your API script at Google’s end, using your own credentials. Naming it “Api Access” will help you follow these notes. (See image below)
- Hit the “CREATE” button. (See image below)
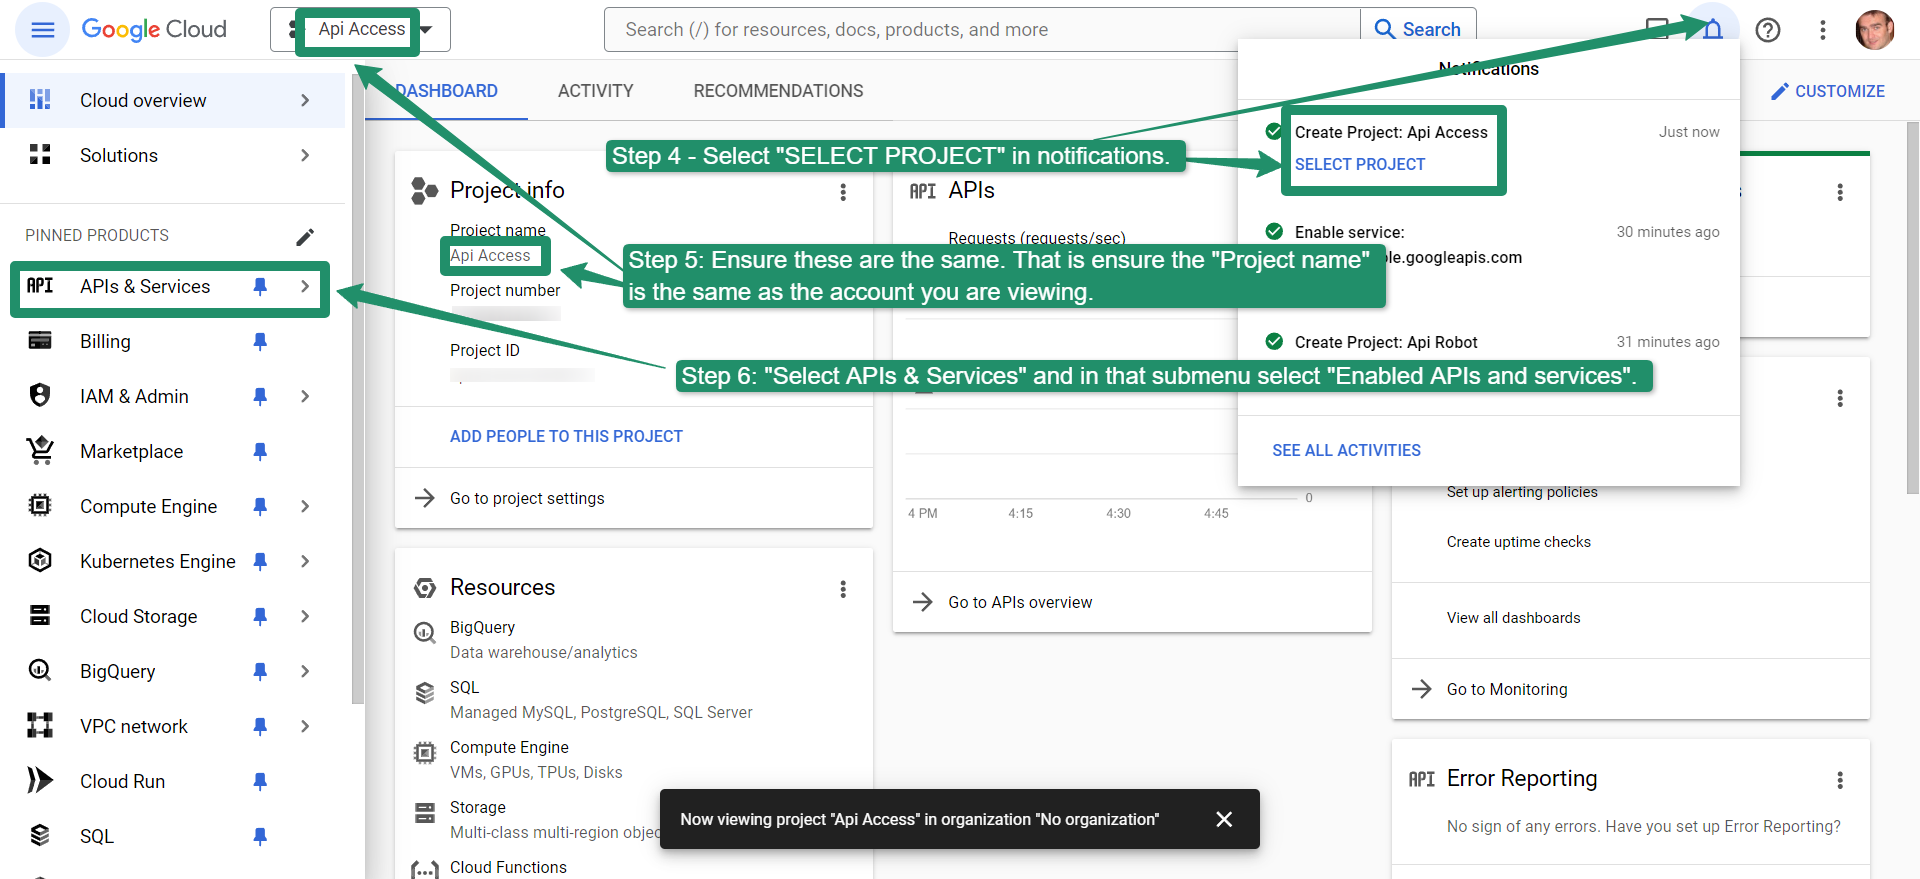
Step 4-6
- Select “SELECT PROJECT” in the notifications. (See image below)
- Ensure the “Project name” is the same as the account you are viewing. (See image below)
- Select “APIs & Services” and in the submenu, select “Enabled APIs and services”. (See image below)
Step 7
- Select “Enable APIs and Services”.

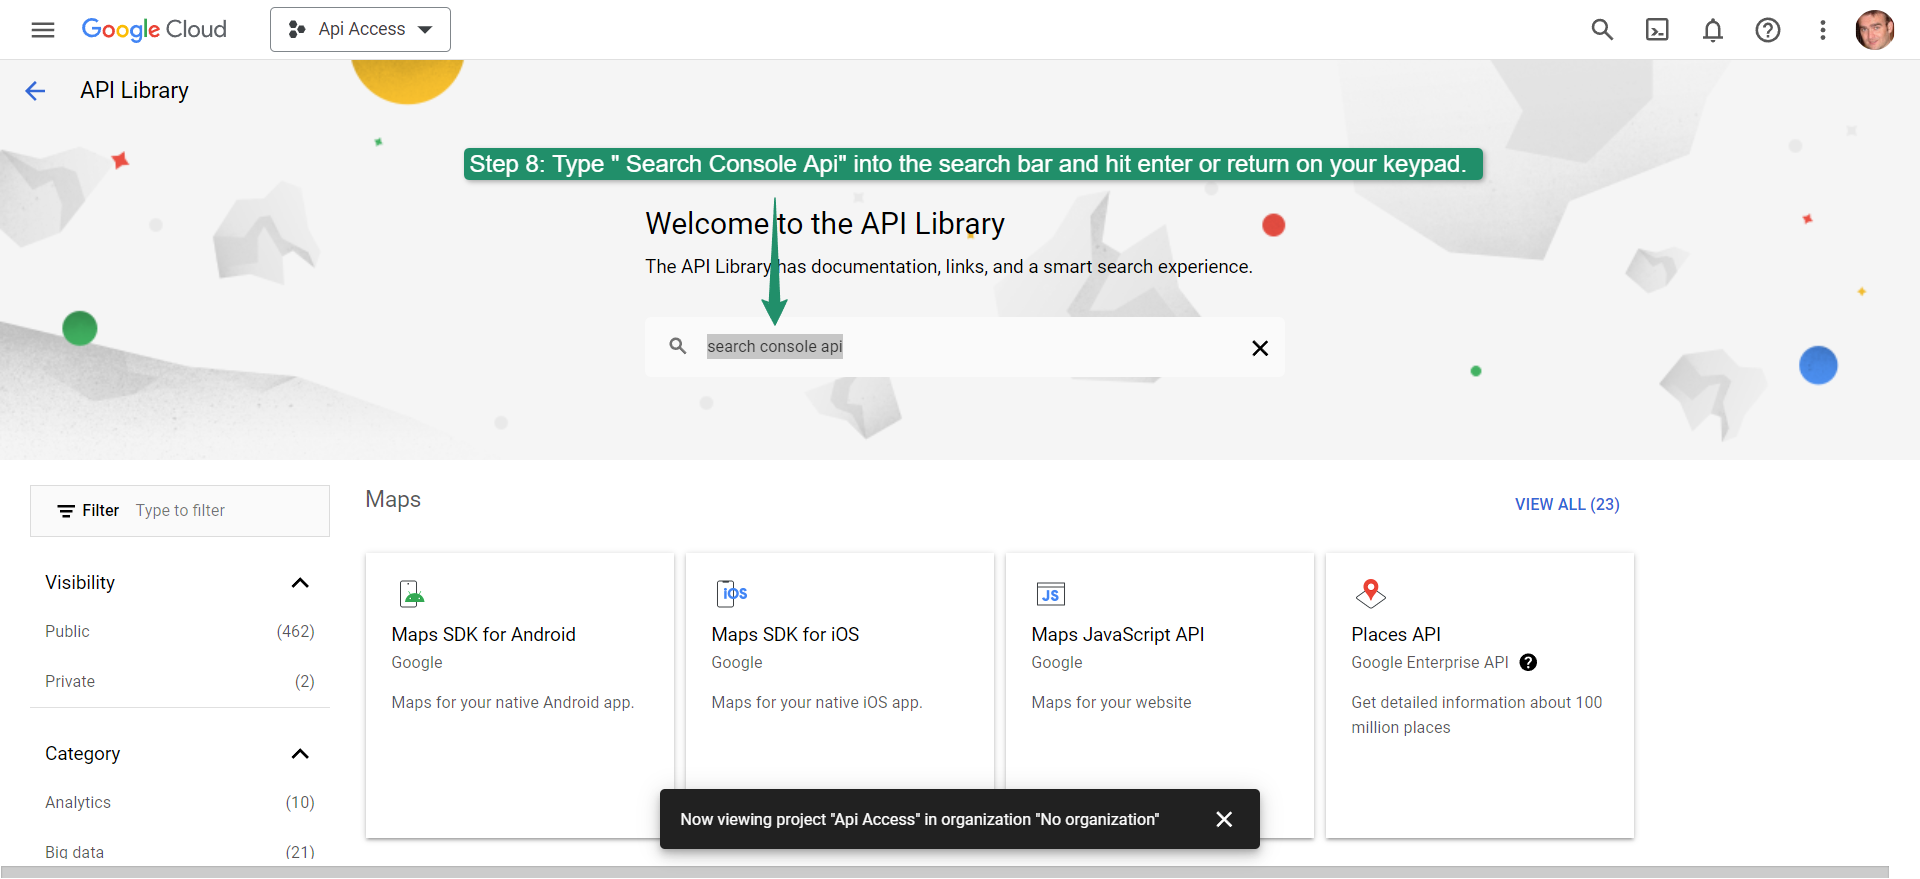
Step 8
- Type “Search Console API” into the search bar and hit enter or return on your keypad.
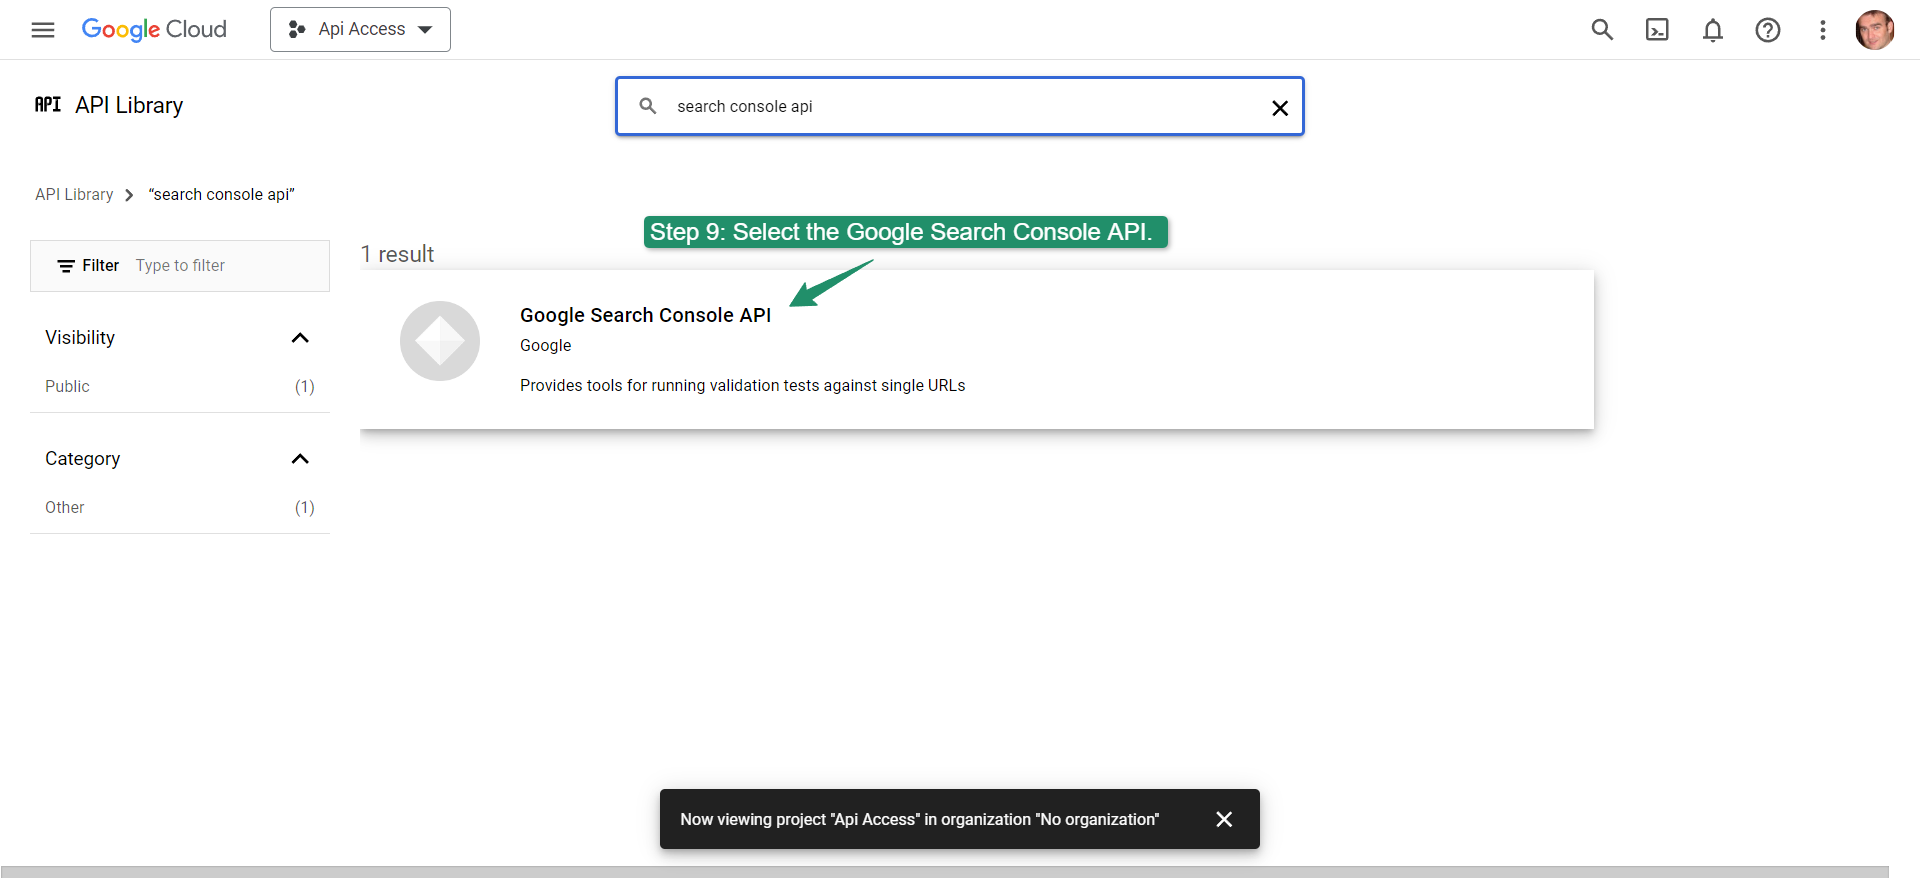
Step 9
- Select the Google Search Console API.
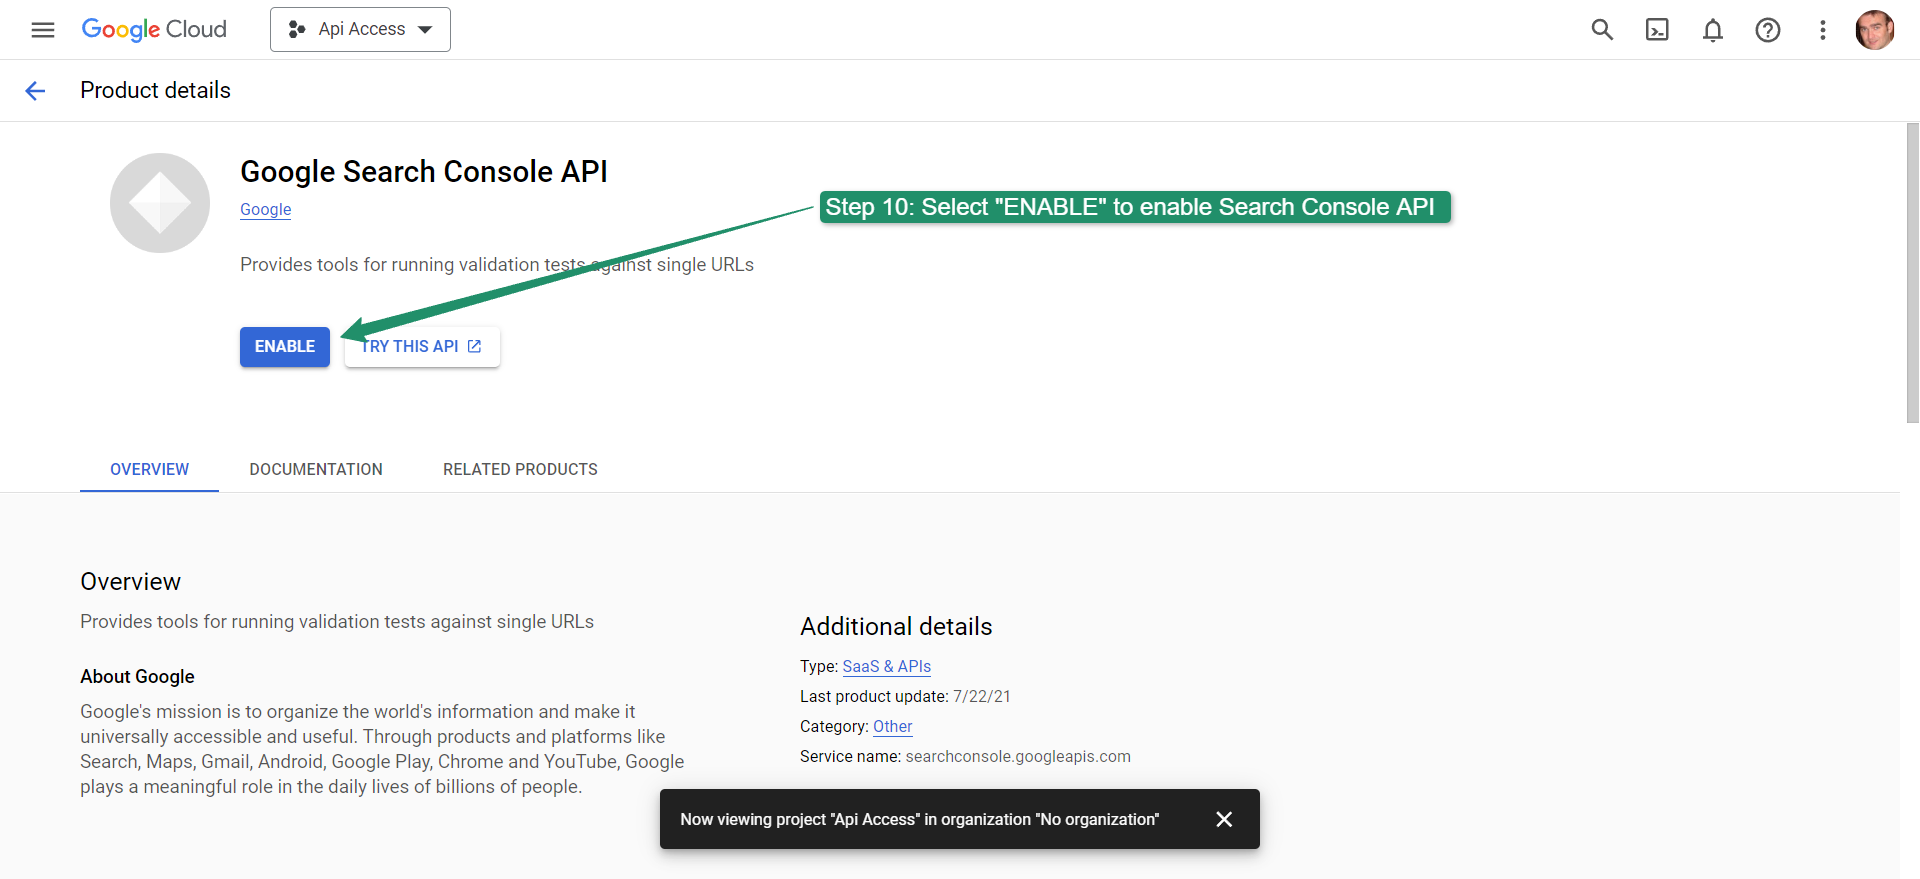
Step 10
- Select “ENABLE” to enable the Search Console API.
Step 11
- Select the “Google Cloud” logo.

Step 12
Copy the “Project number”
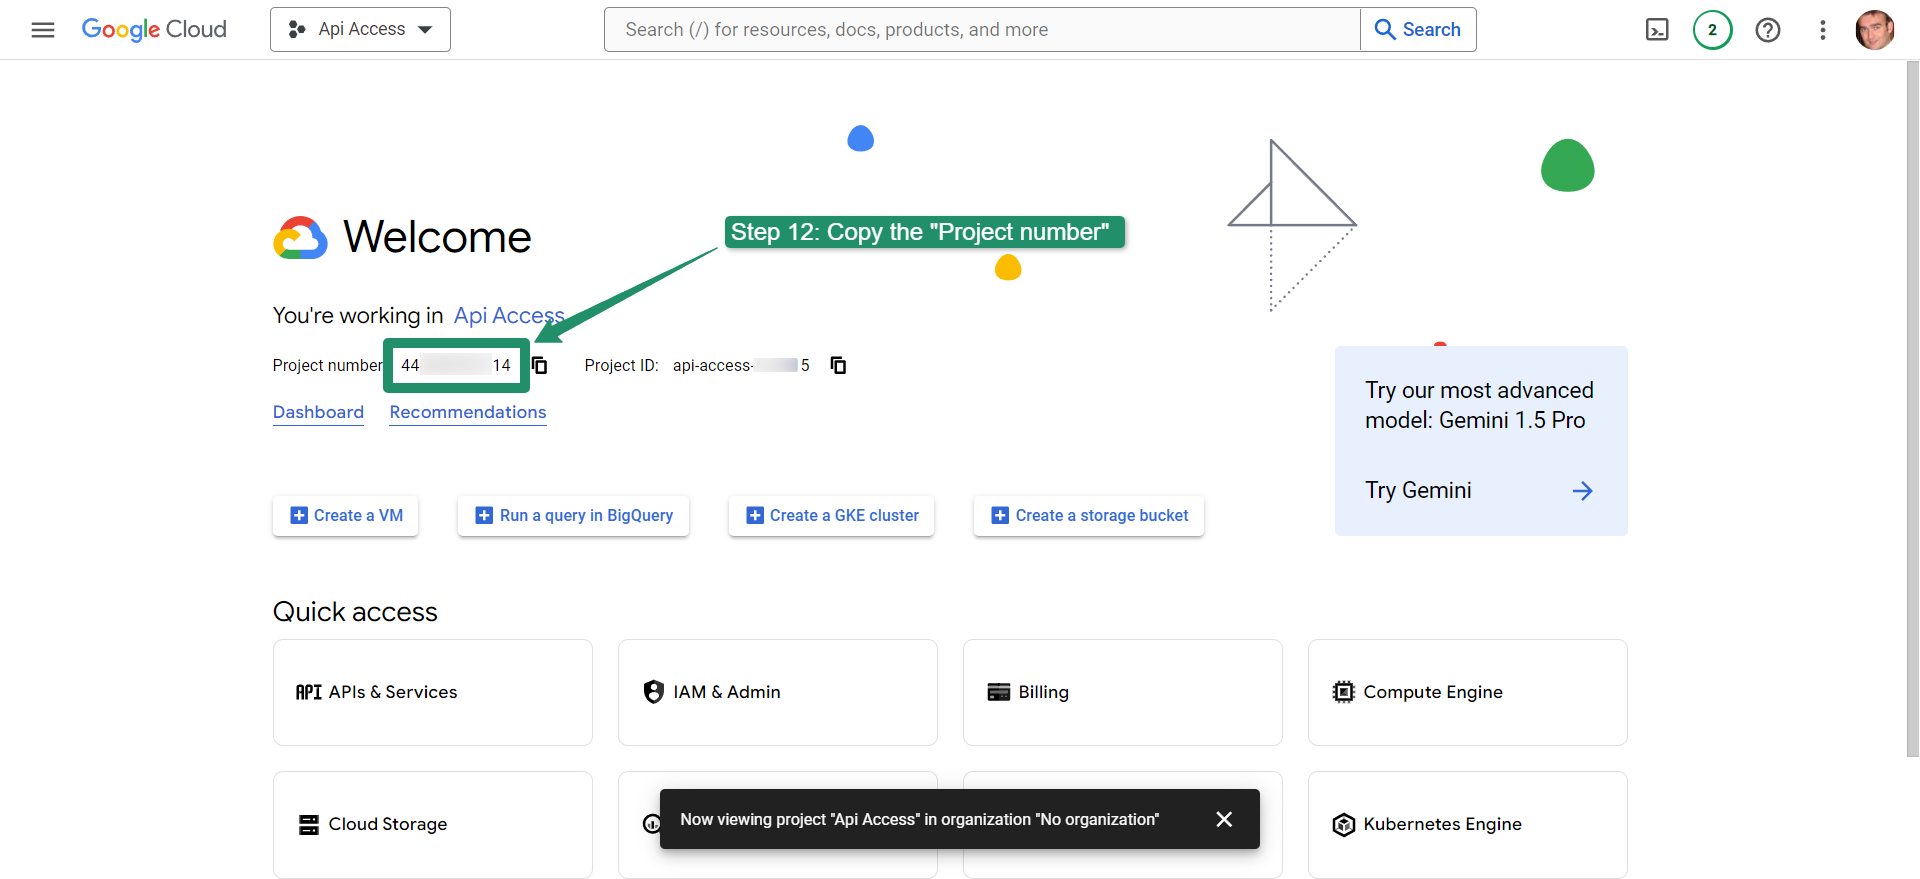
You have now created your project in Google Cloud with your own credentials and have activated the Search Console API. You also now have the “Project number” copied to the clipboard.
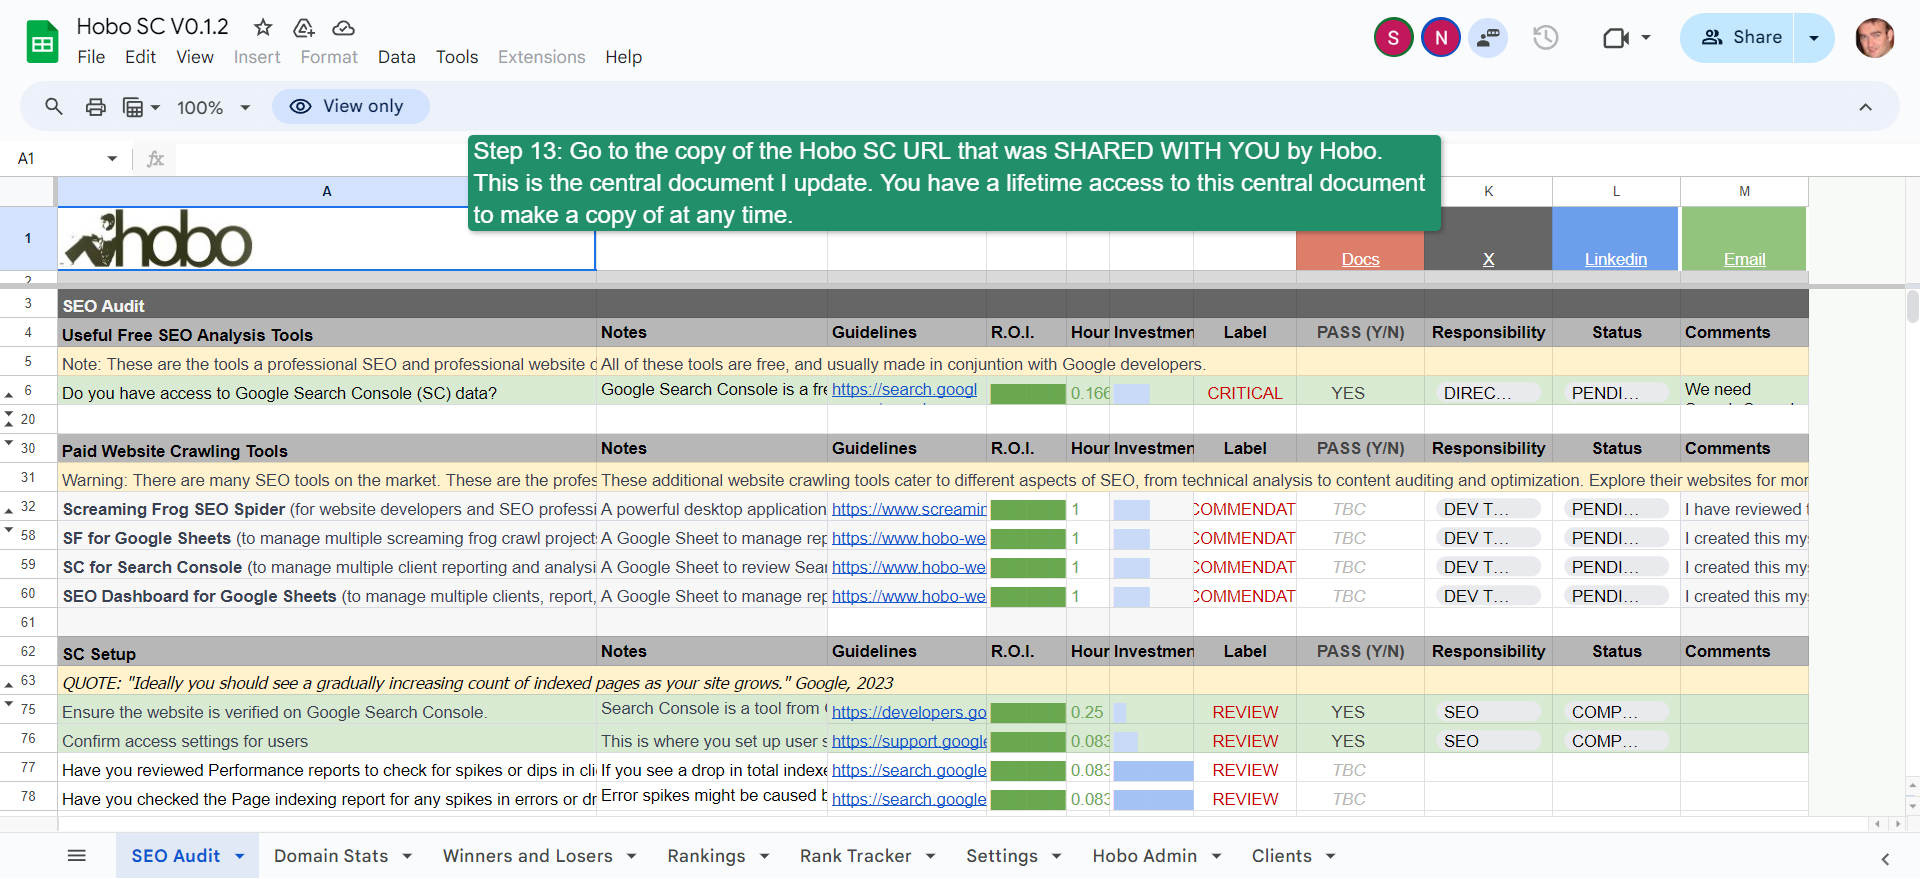
Step 13
- Go to the copy of the Hobo SC URL that was SHARED WITH YOU by Hobo. This is the central document I update. You have lifetime access to this central document to make a copy of at any time.
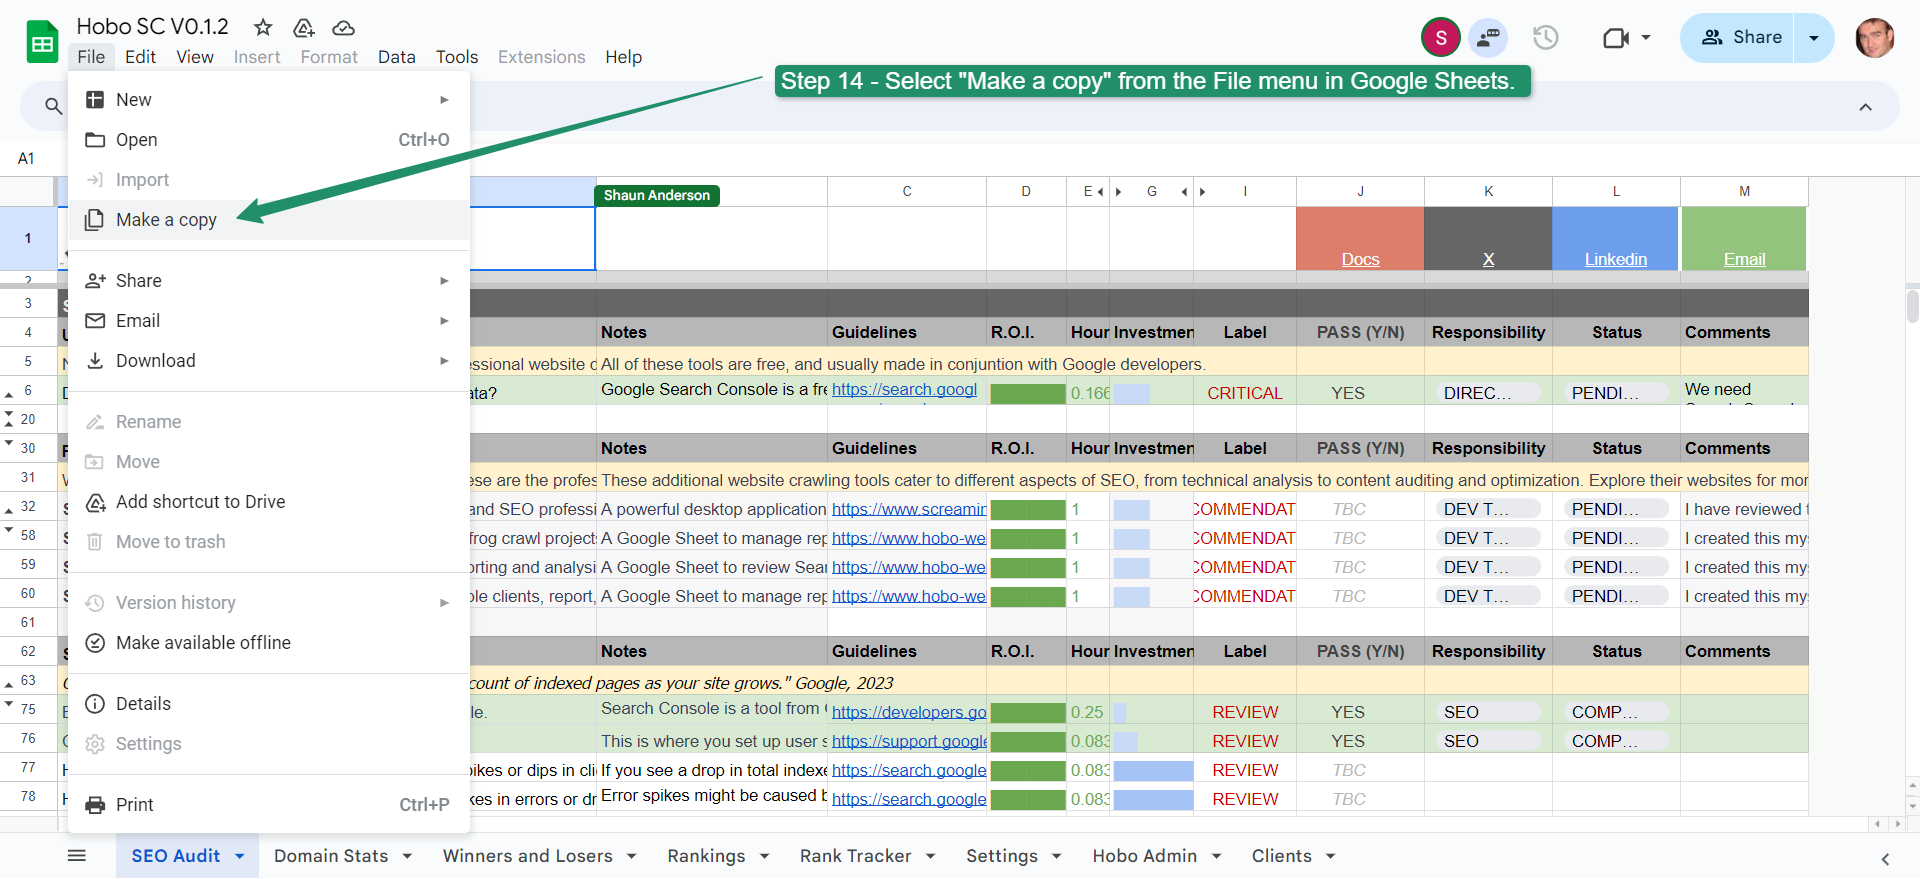
Step 14
- Select “Make a copy” from the File menu in Google Sheets.
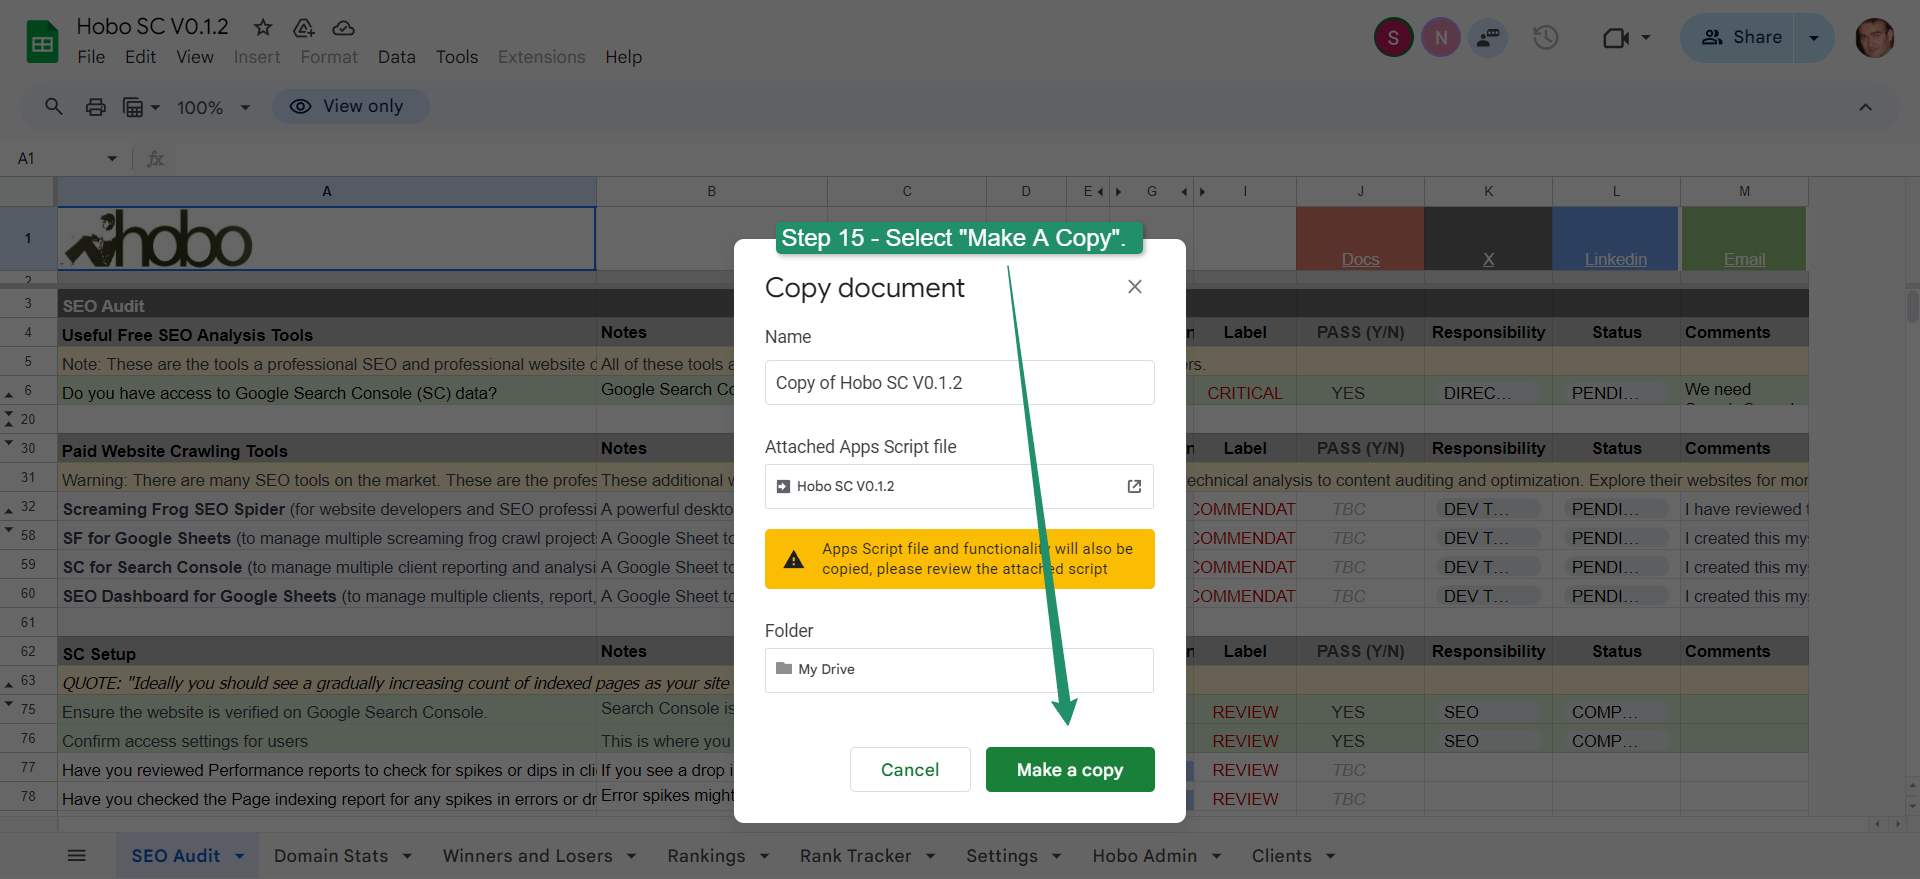
Step 15
- Select “Make A Copy”.
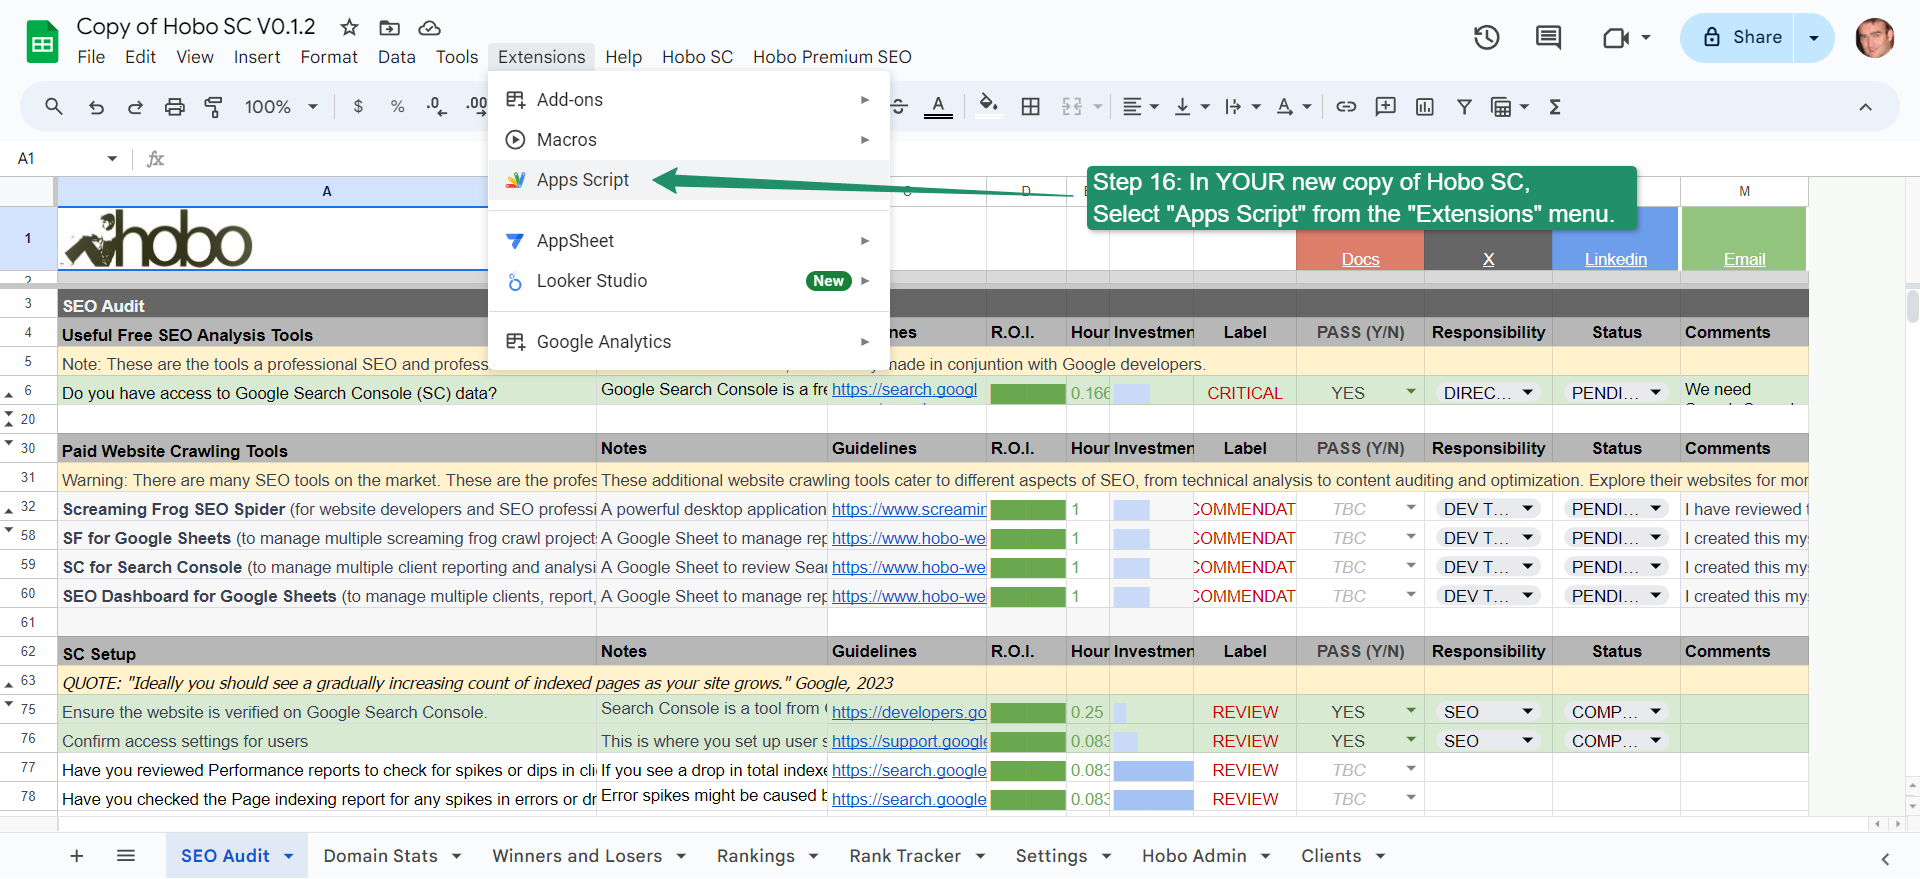
Step 16
In YOUR new copy of Hobo SC, Select “Apps Script” from the “Extensions” menu.
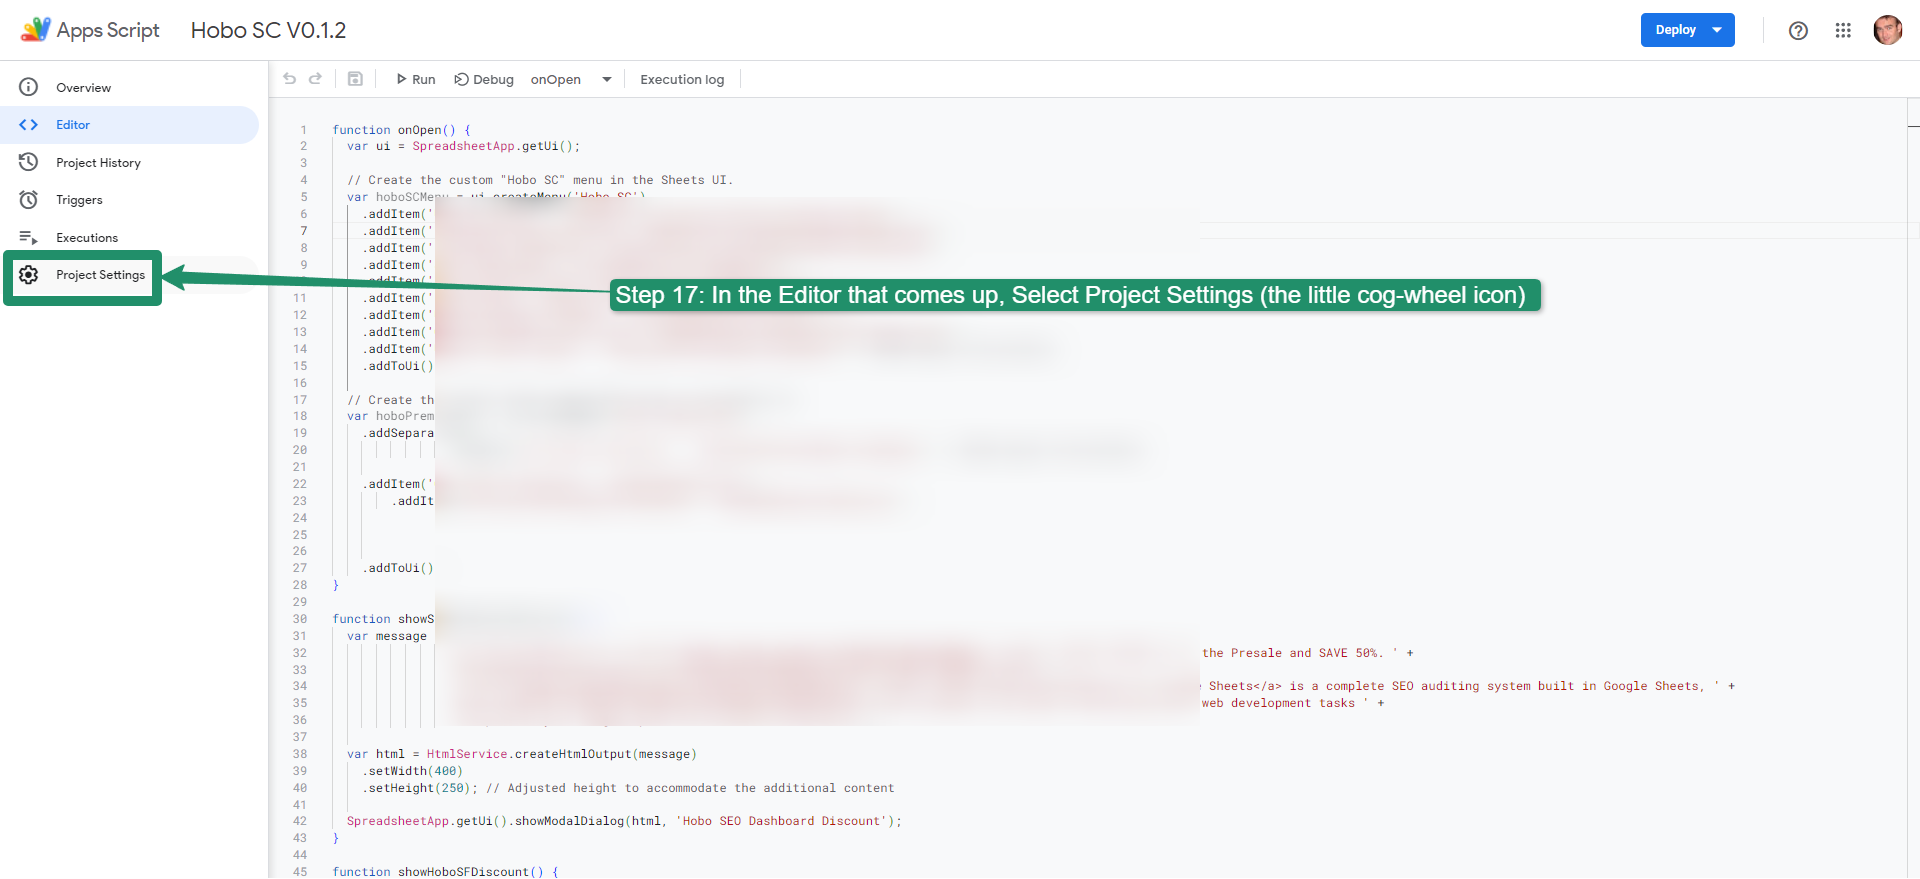
Step 17
In the Editor that comes up, Select Project Settings (the little cog-wheel icon)
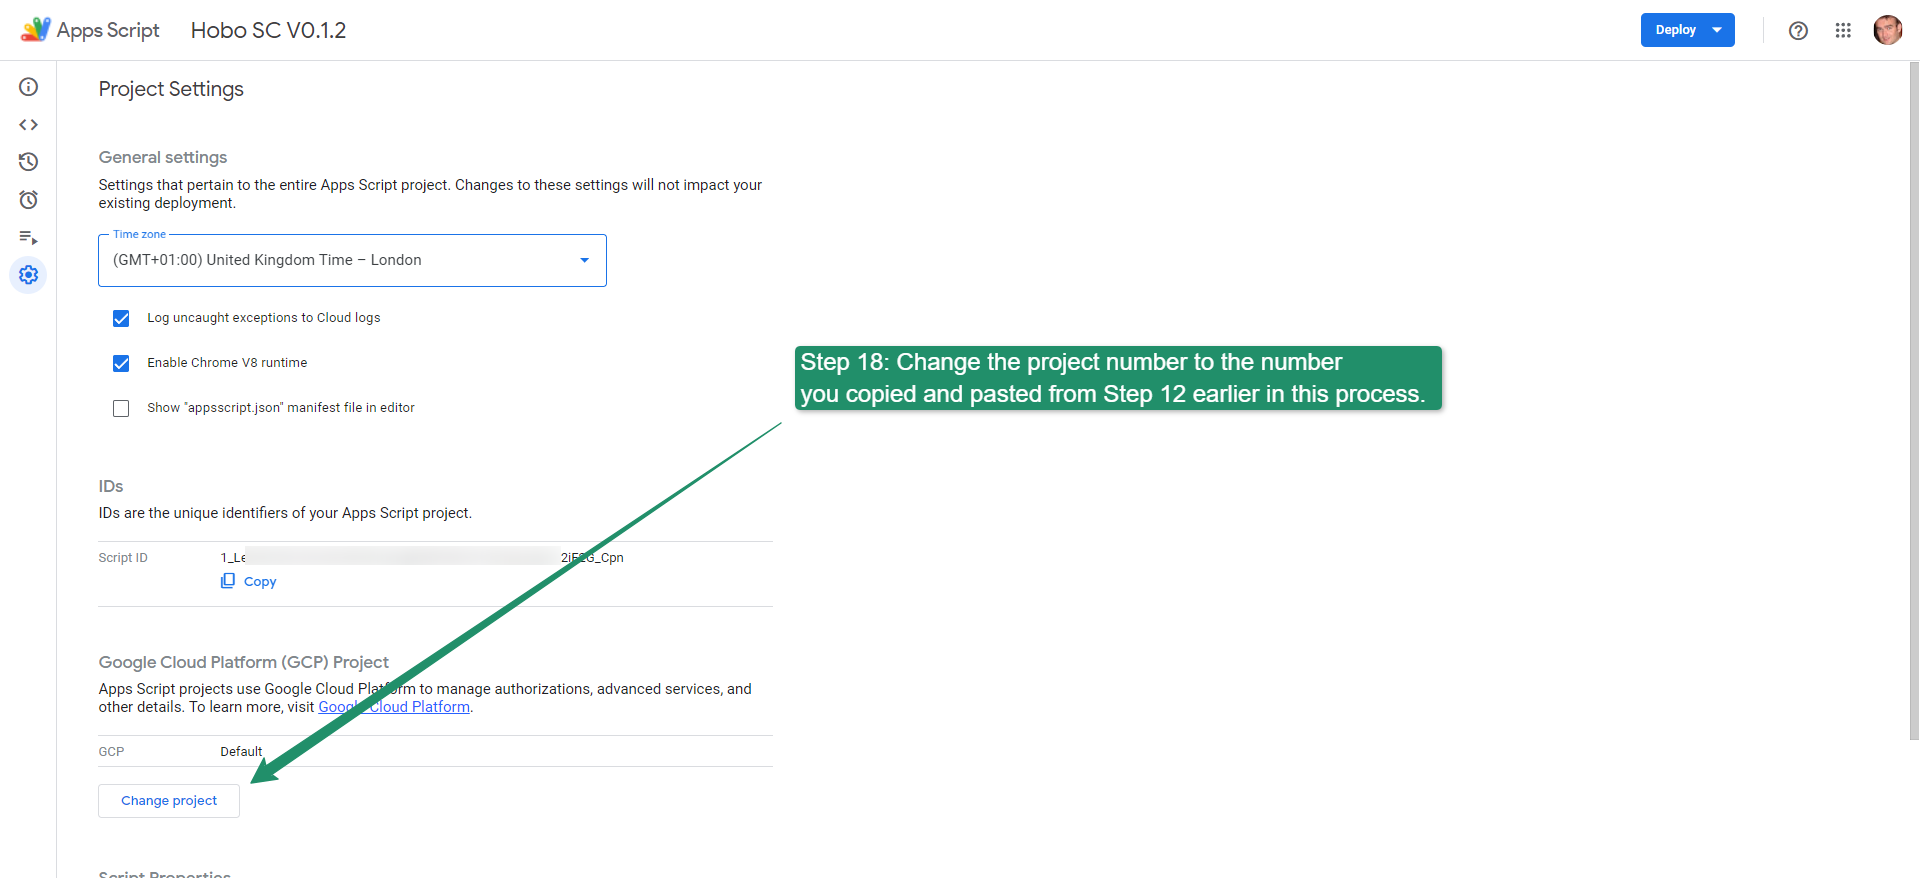
Step 18
In Project Settings, change the project number to the number you copied and pasted from Step 12 earlier in this process.
Step 19
Select the Set project button.

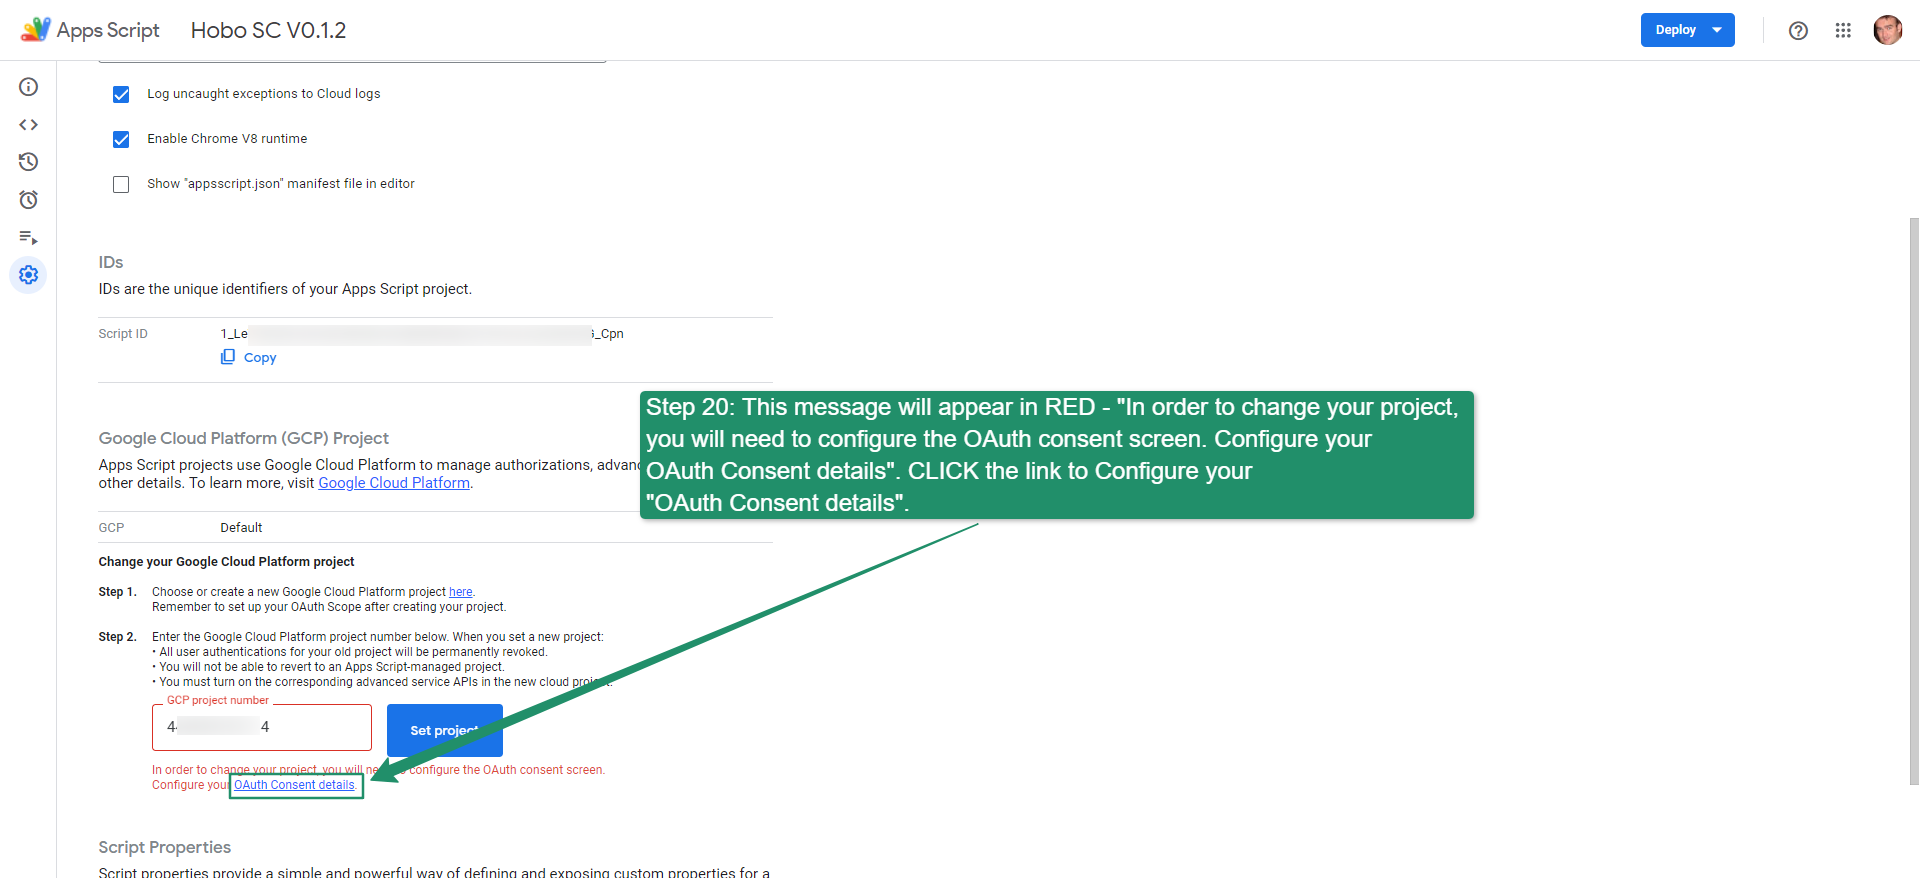
Step 20
This message will appear in RED – “In order to change your project, you will need to configure the OAuth consent screen. Configure your OAuth Consent details”. CLICK the link to Configure your “OAuth Consent details”.
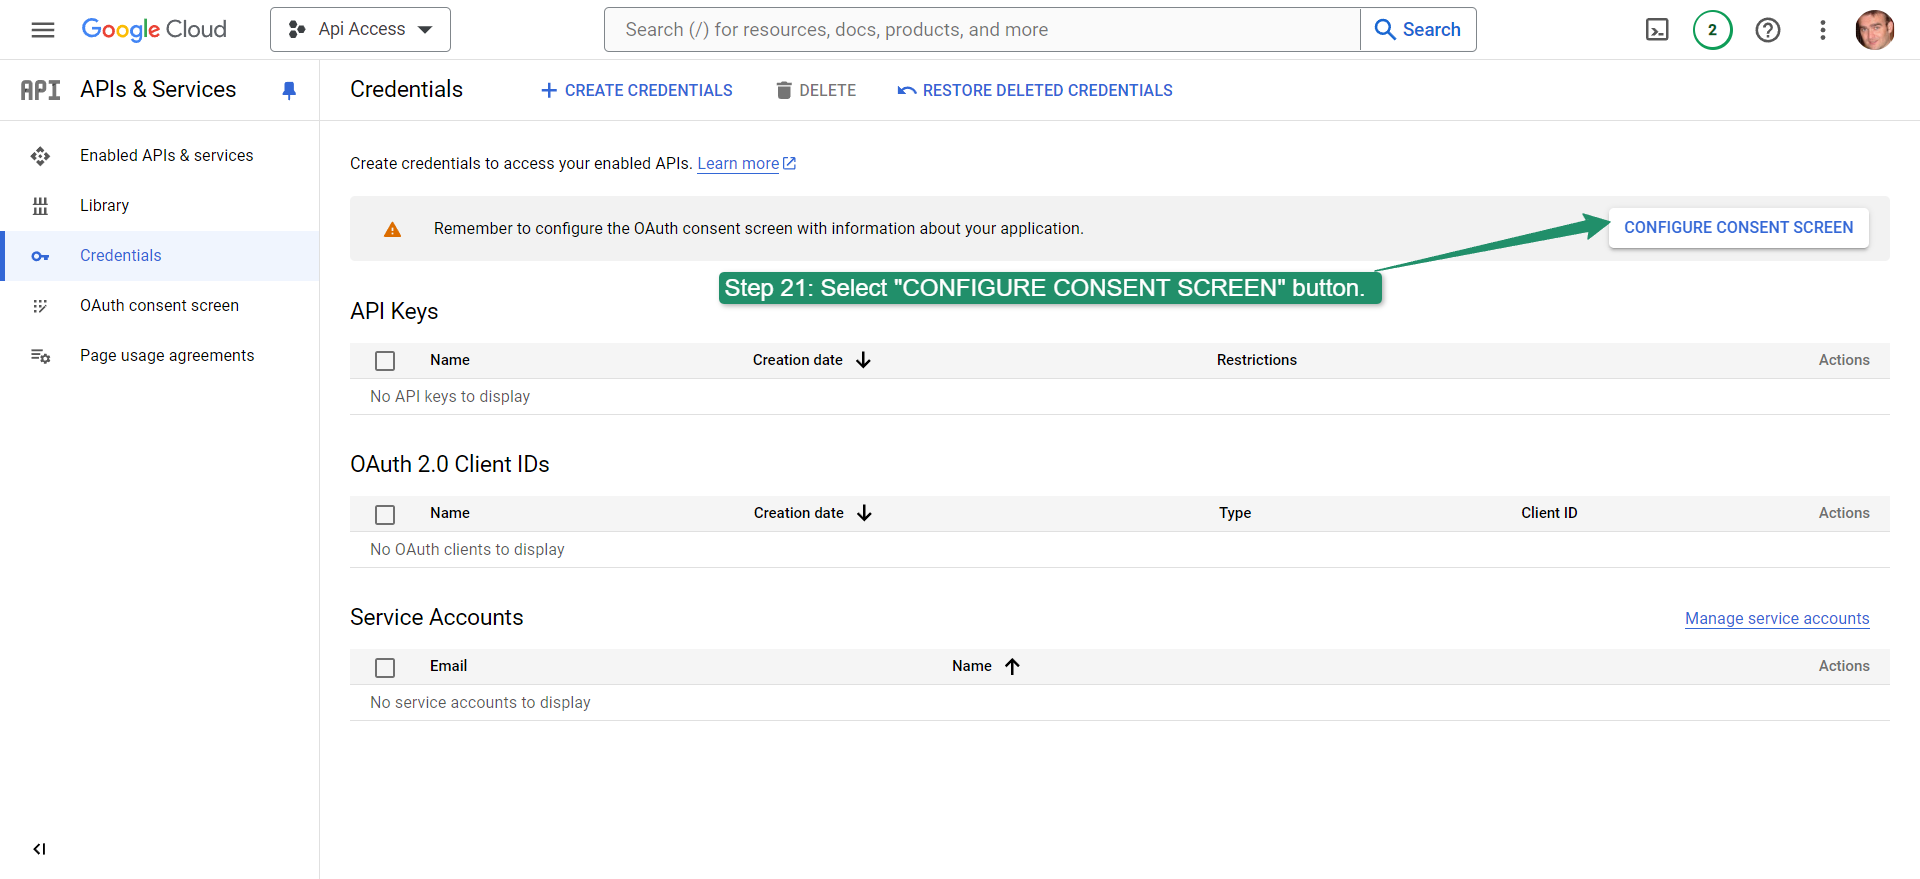
Steps 21
- Select the “CONFIGURE CONSENT SCREEN” button.
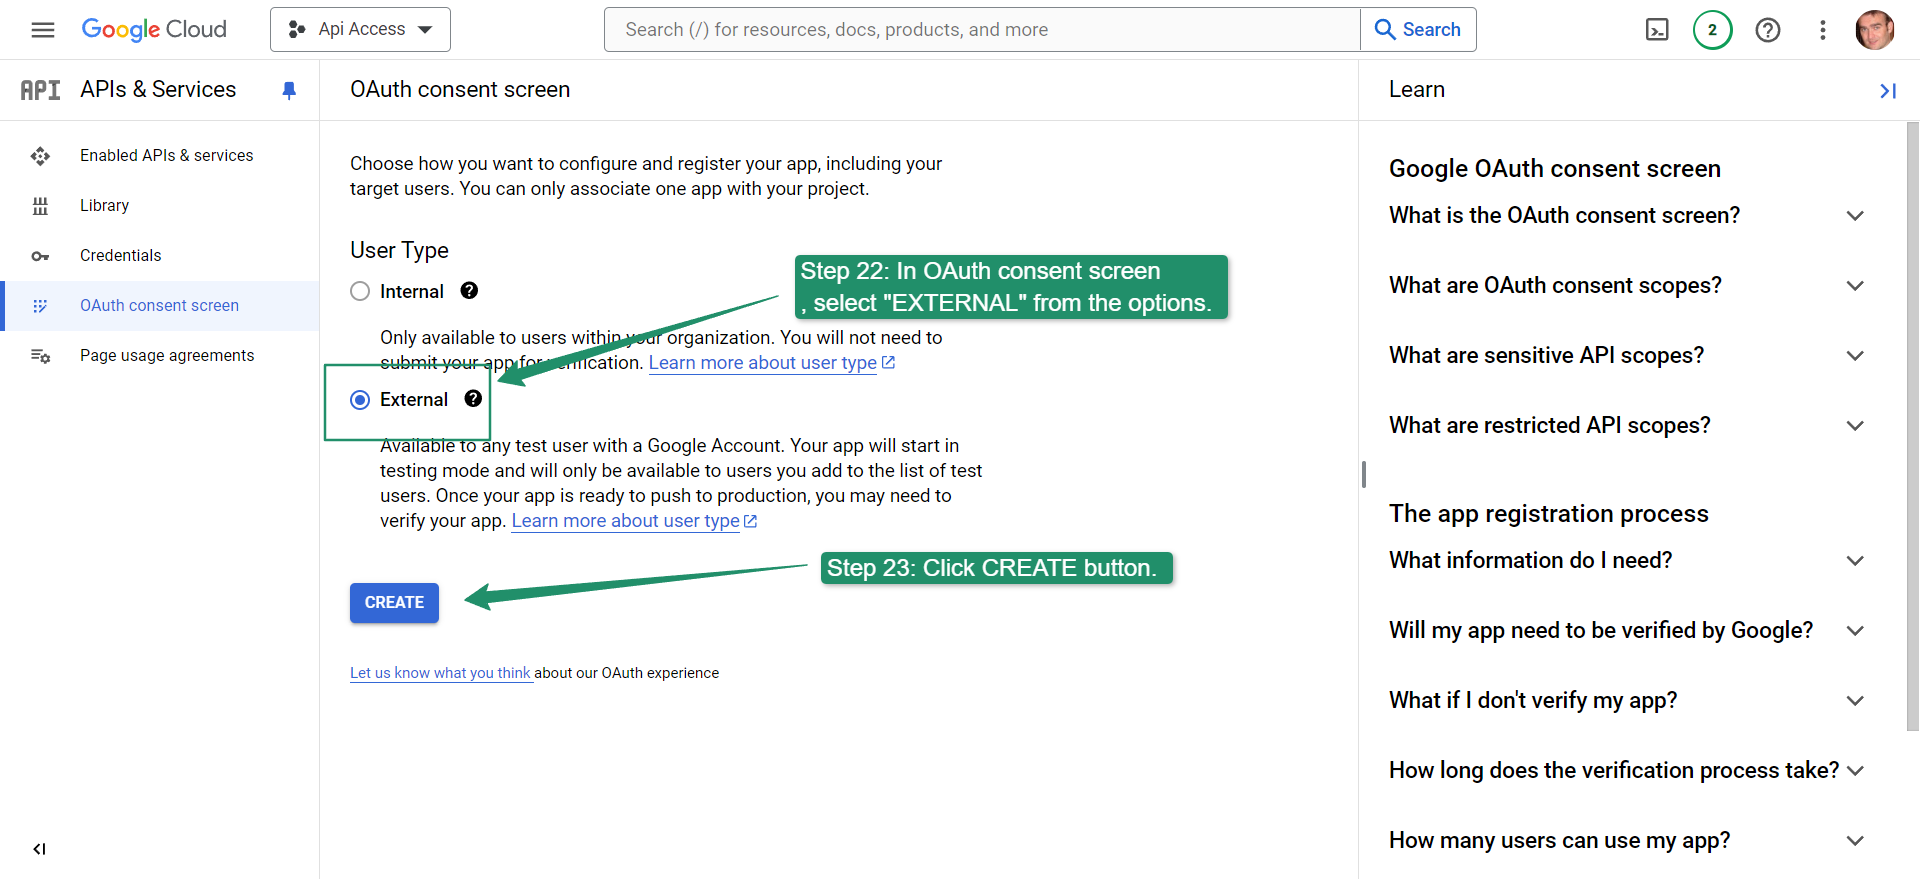
Steps 22-23
- In the OAuth consent screen, select “EXTERNAL” from the options.
- Click the CREATE button.
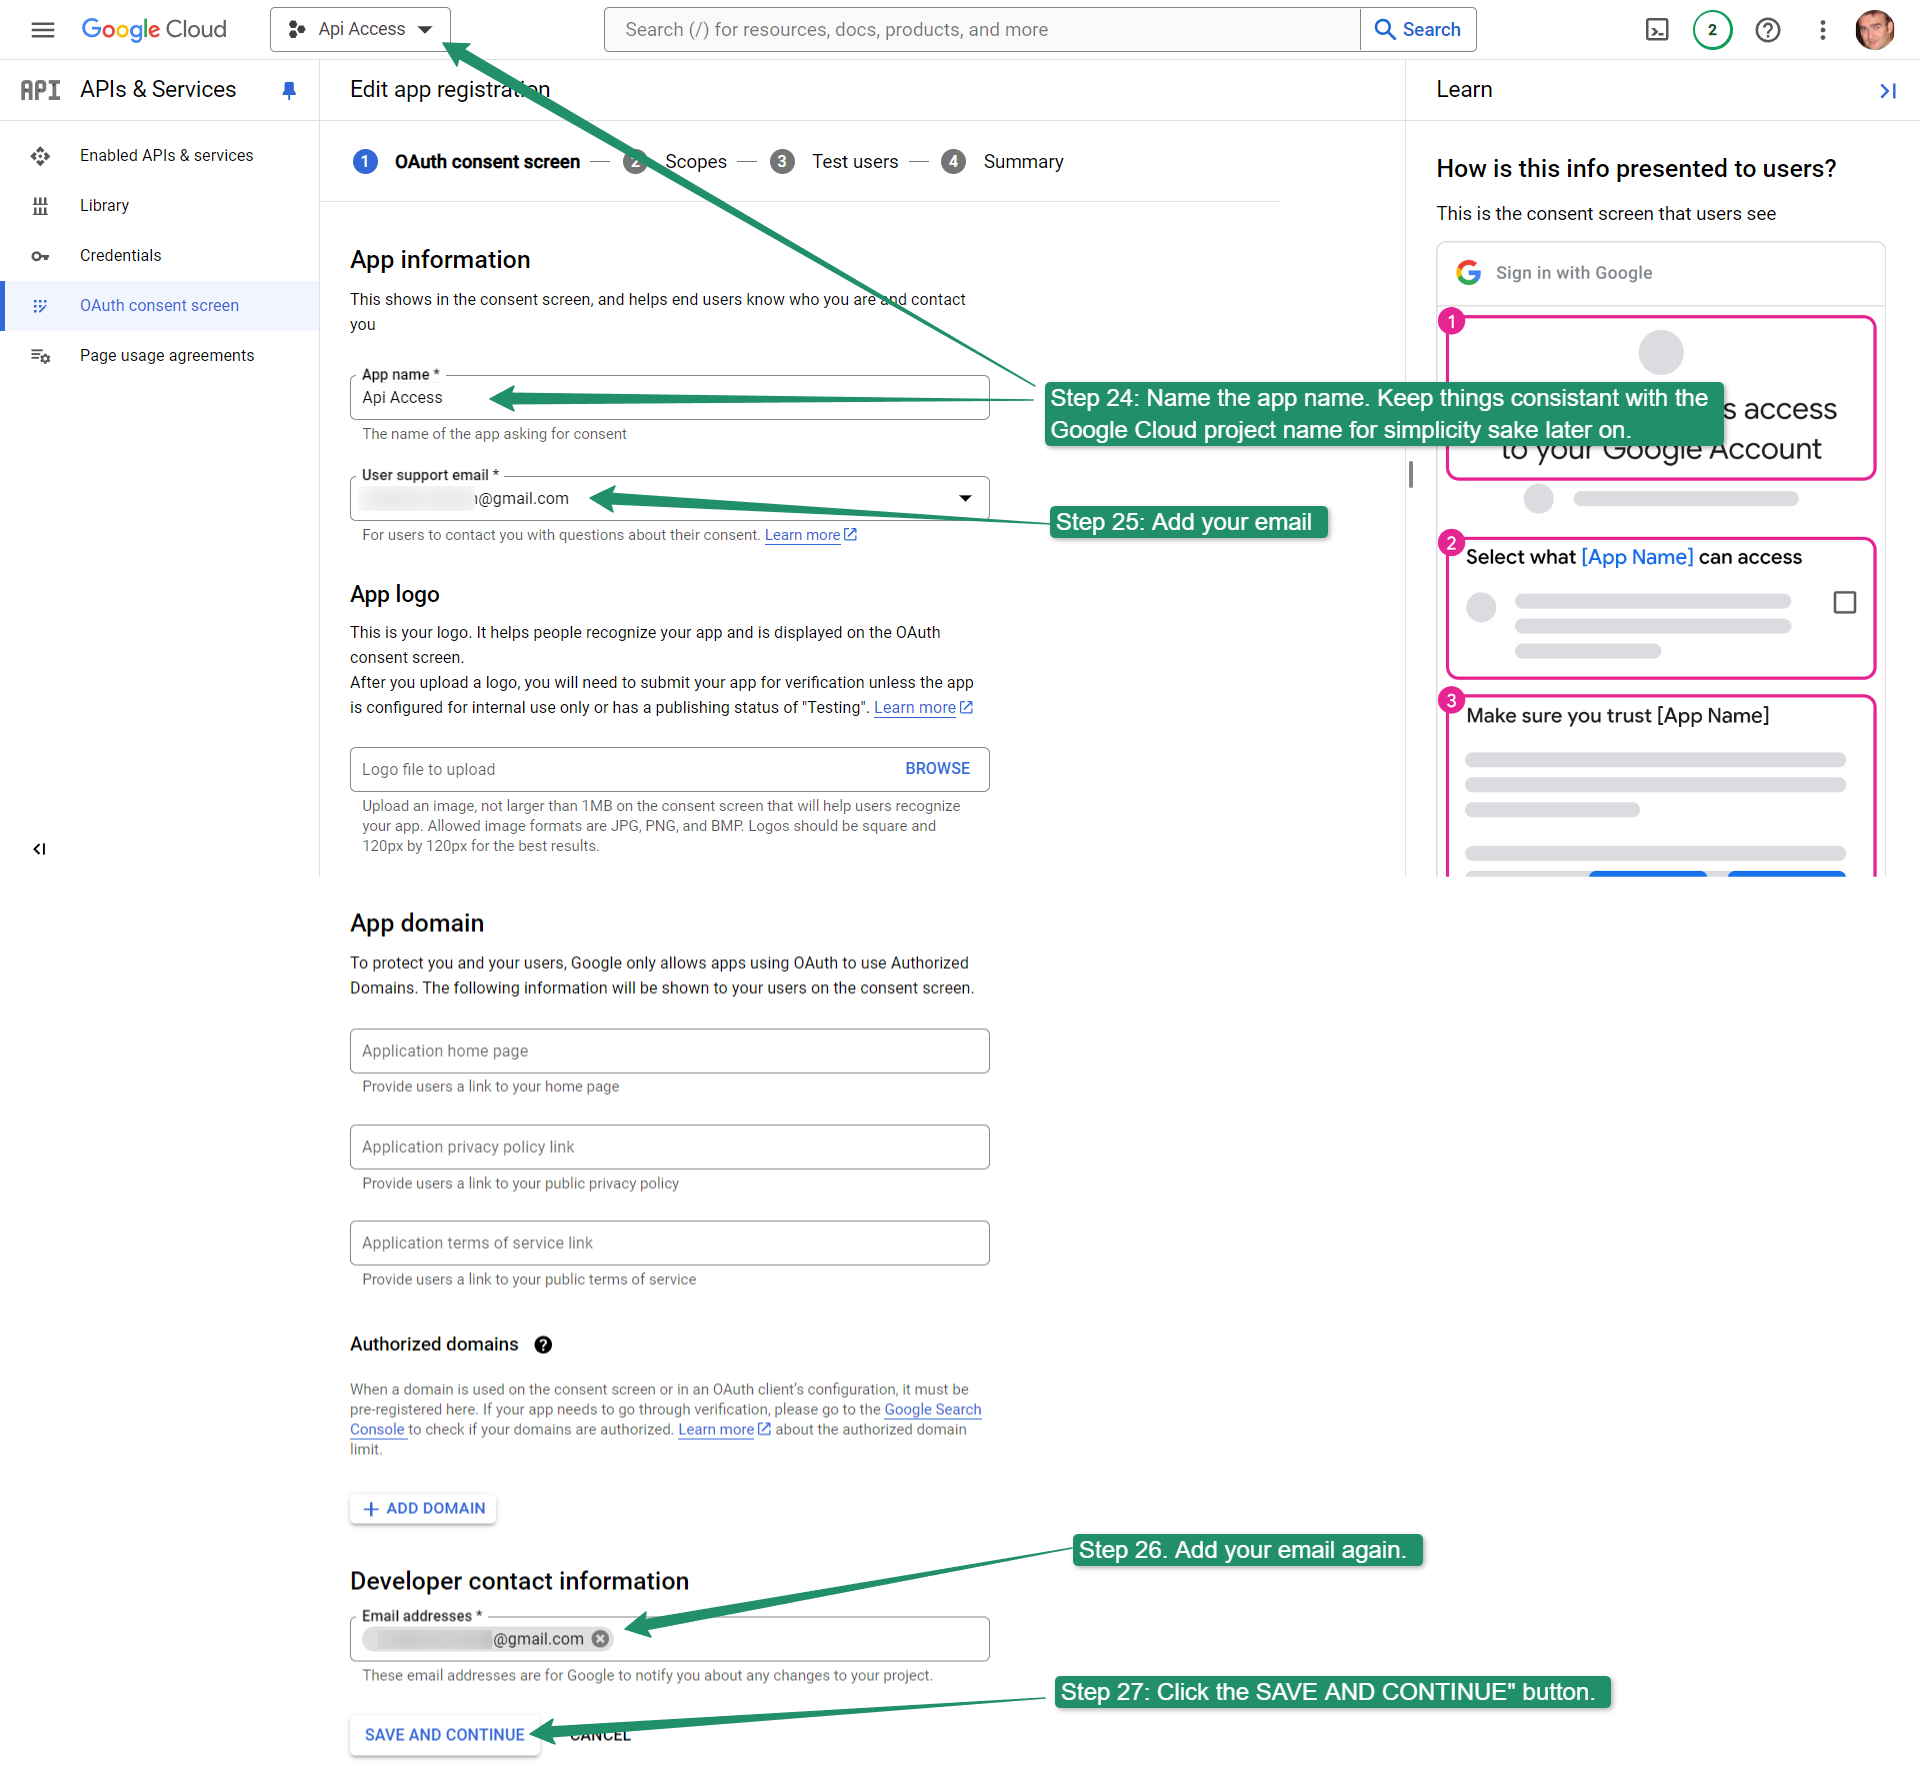
Steps 24-27
- Name the app name in “App name”. Keep things consistent with the Google Cloud project name for simplicity’s sake later on.
- Add your email to the “user support email”
- Add your email again to the developer contact info
- Click the “SAVE AND CONTINUE” button.
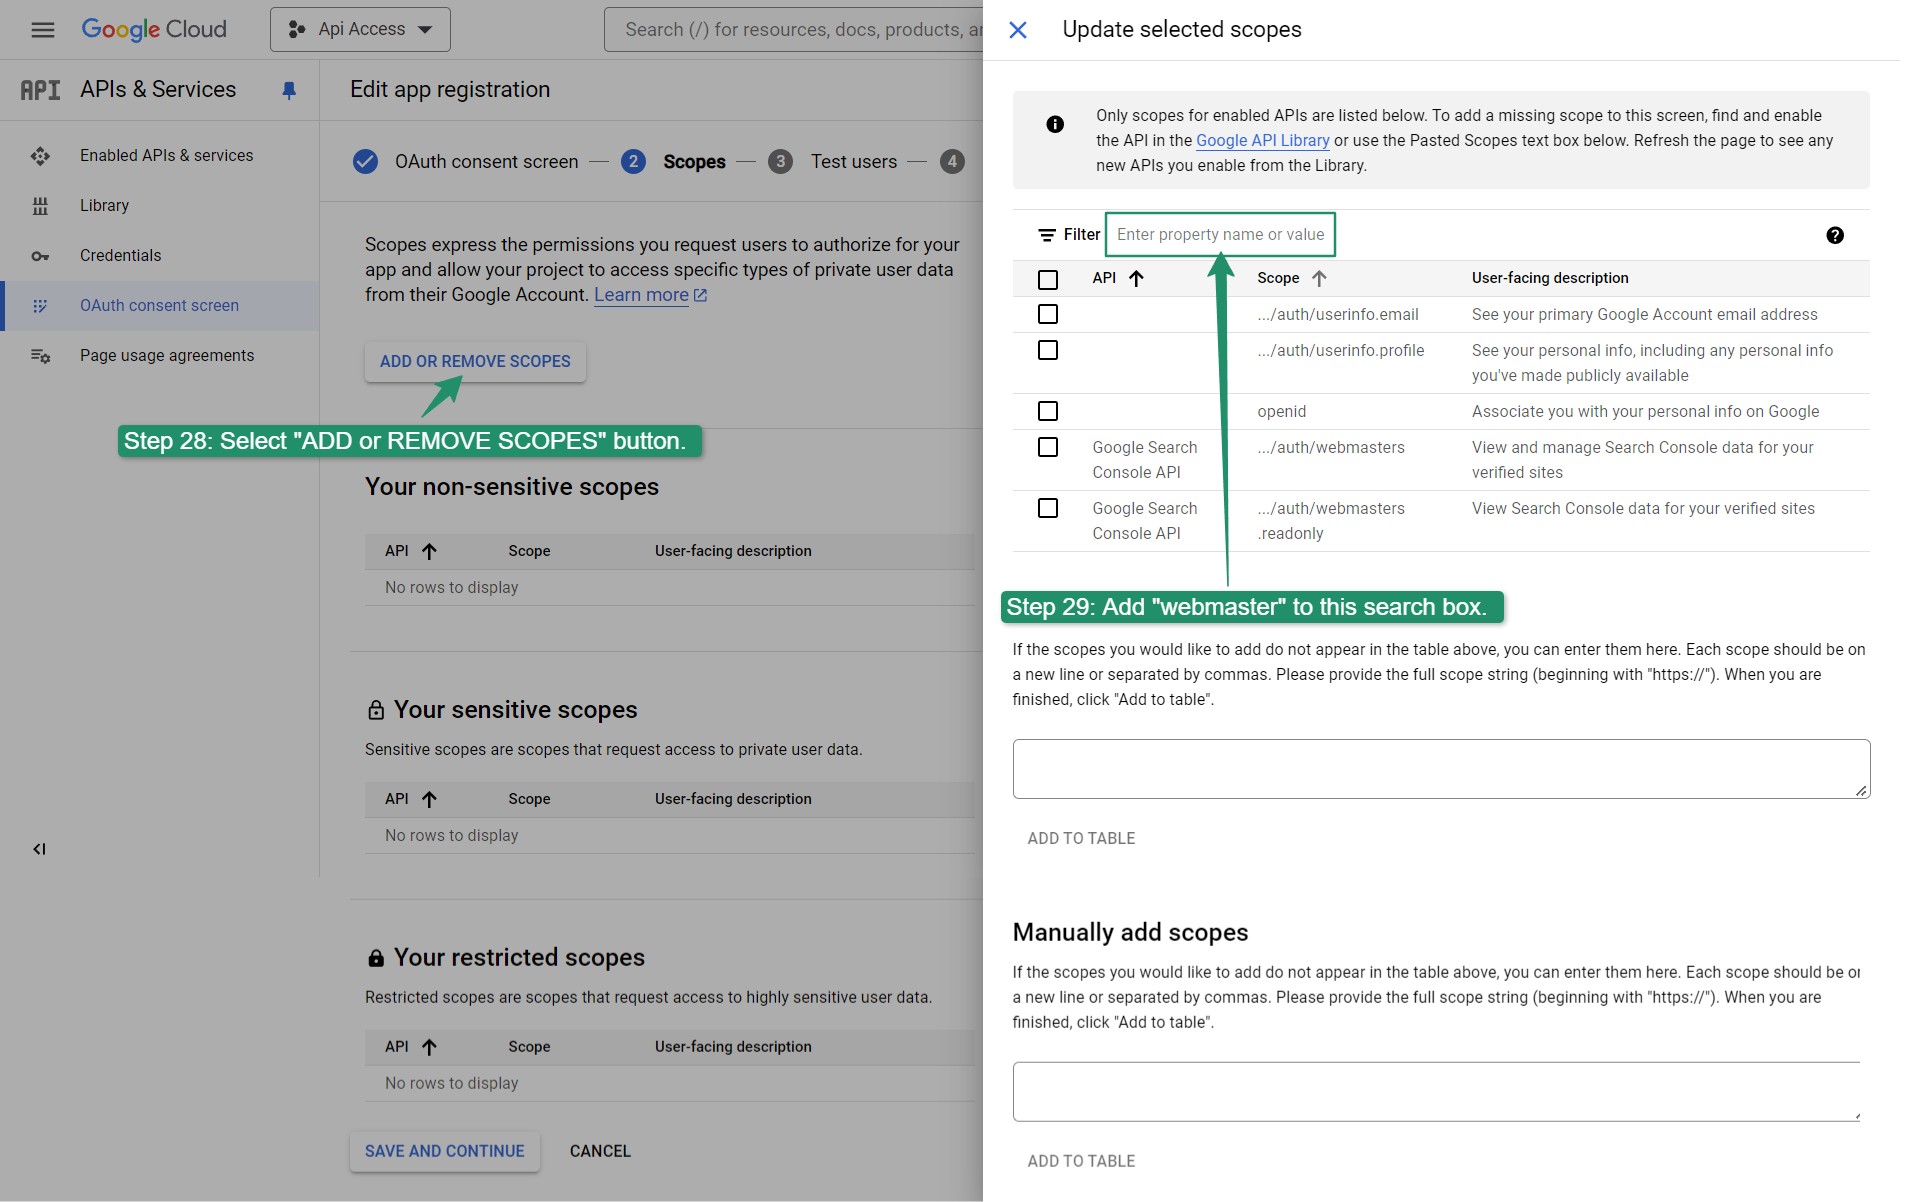
Steps 28-29
- x
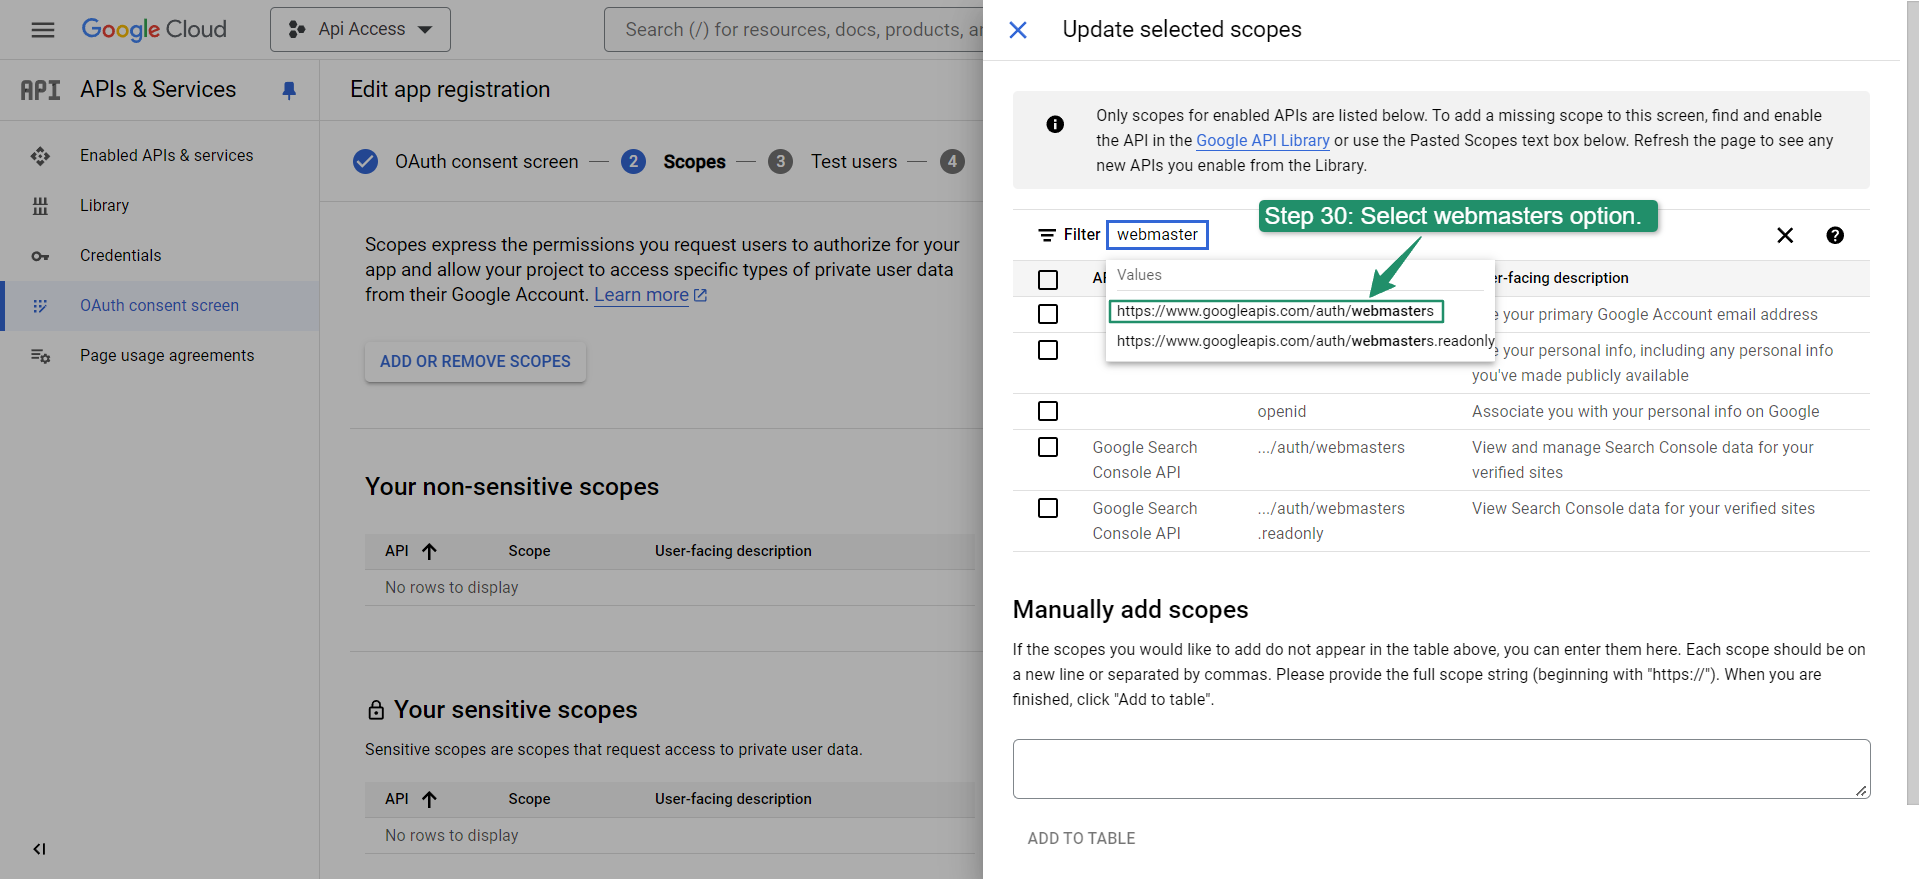
Steps 30
- Select
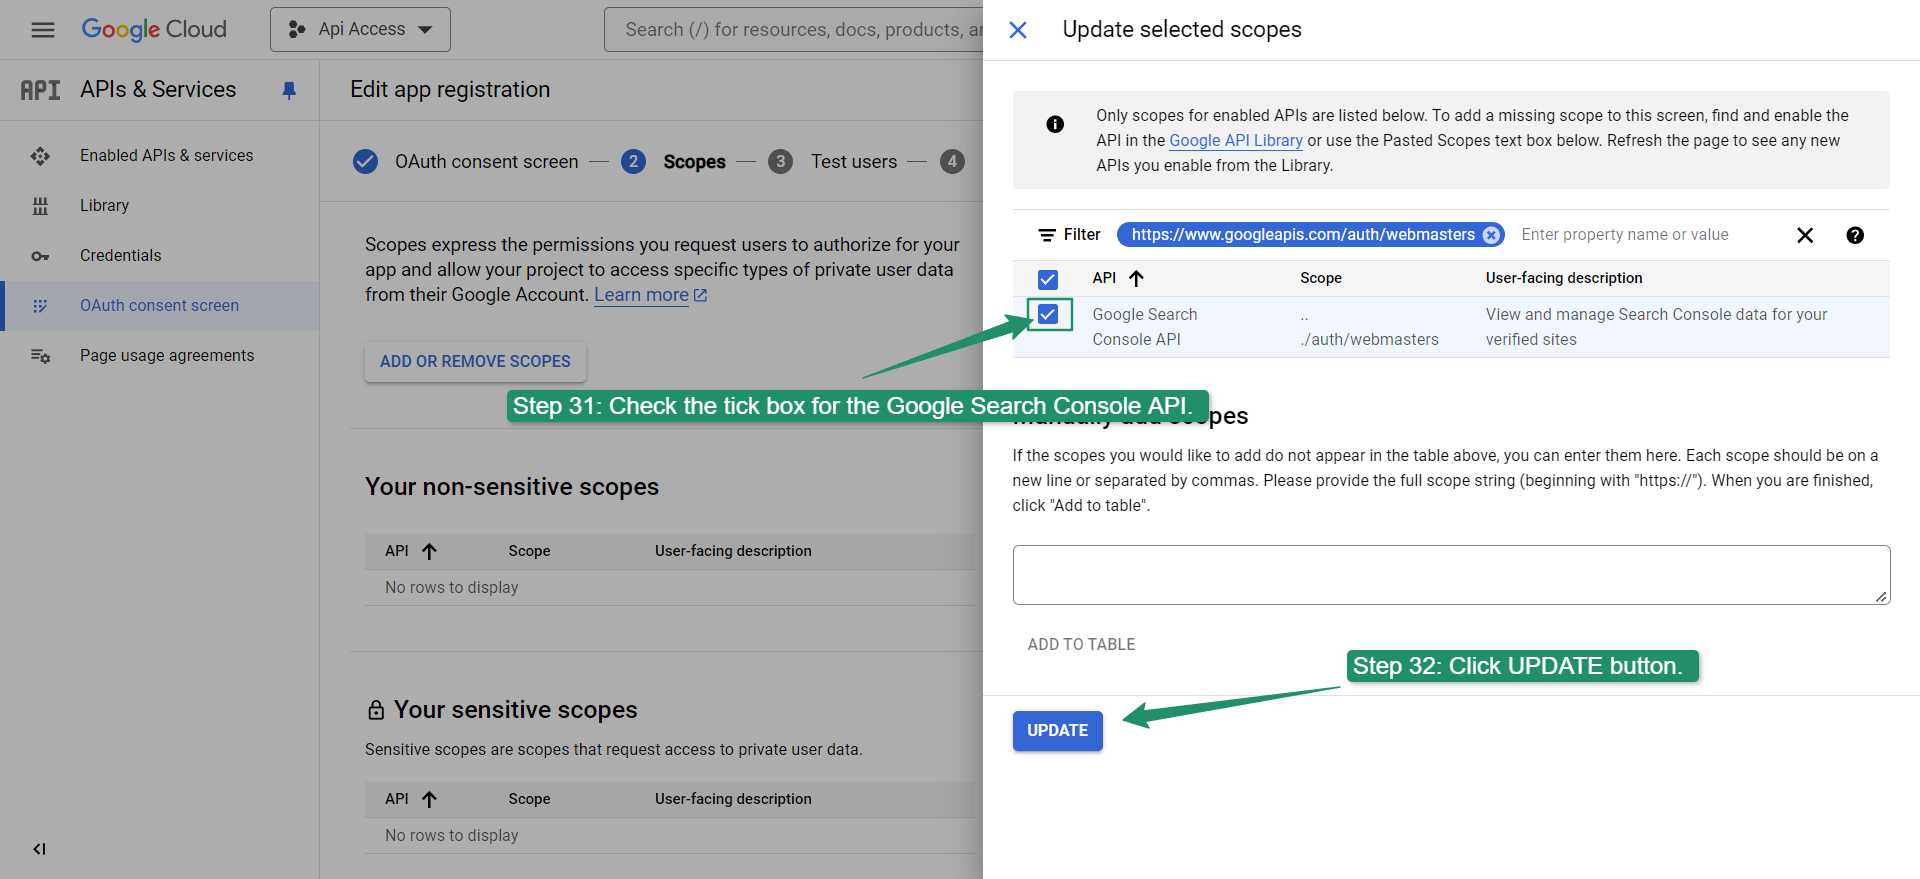
Steps 31-32
- Check the tick box for the Google Search Console API
- Click the “UPDATE” button.
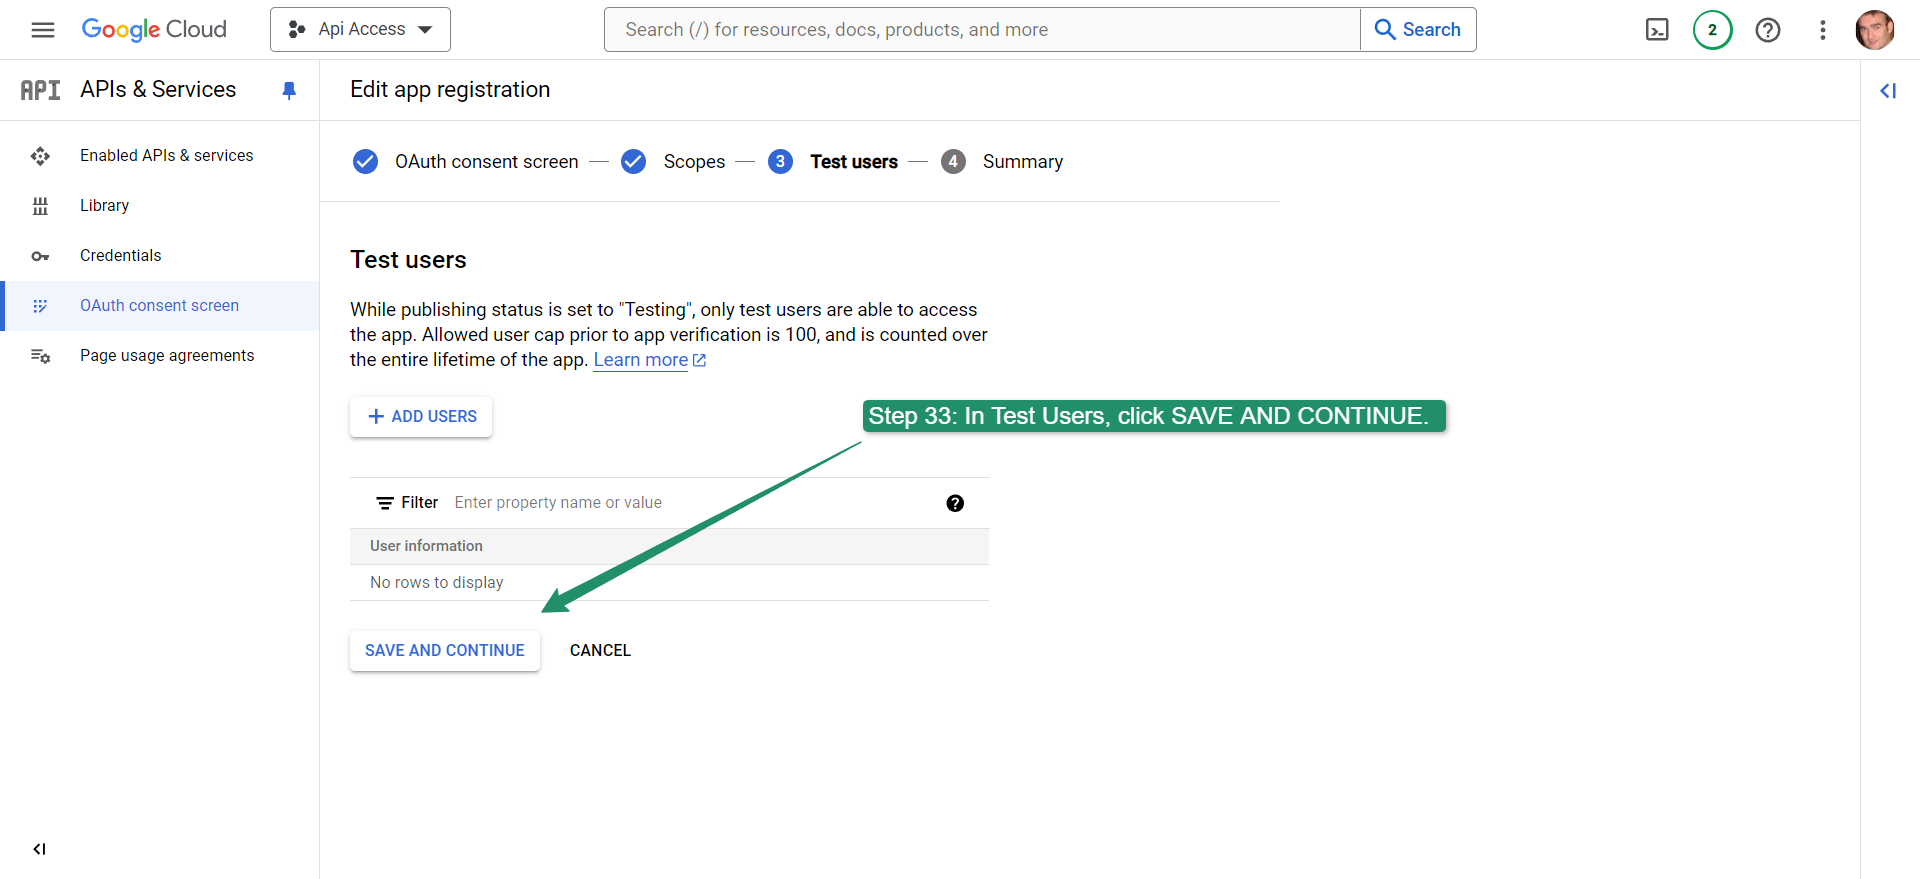
Step 33
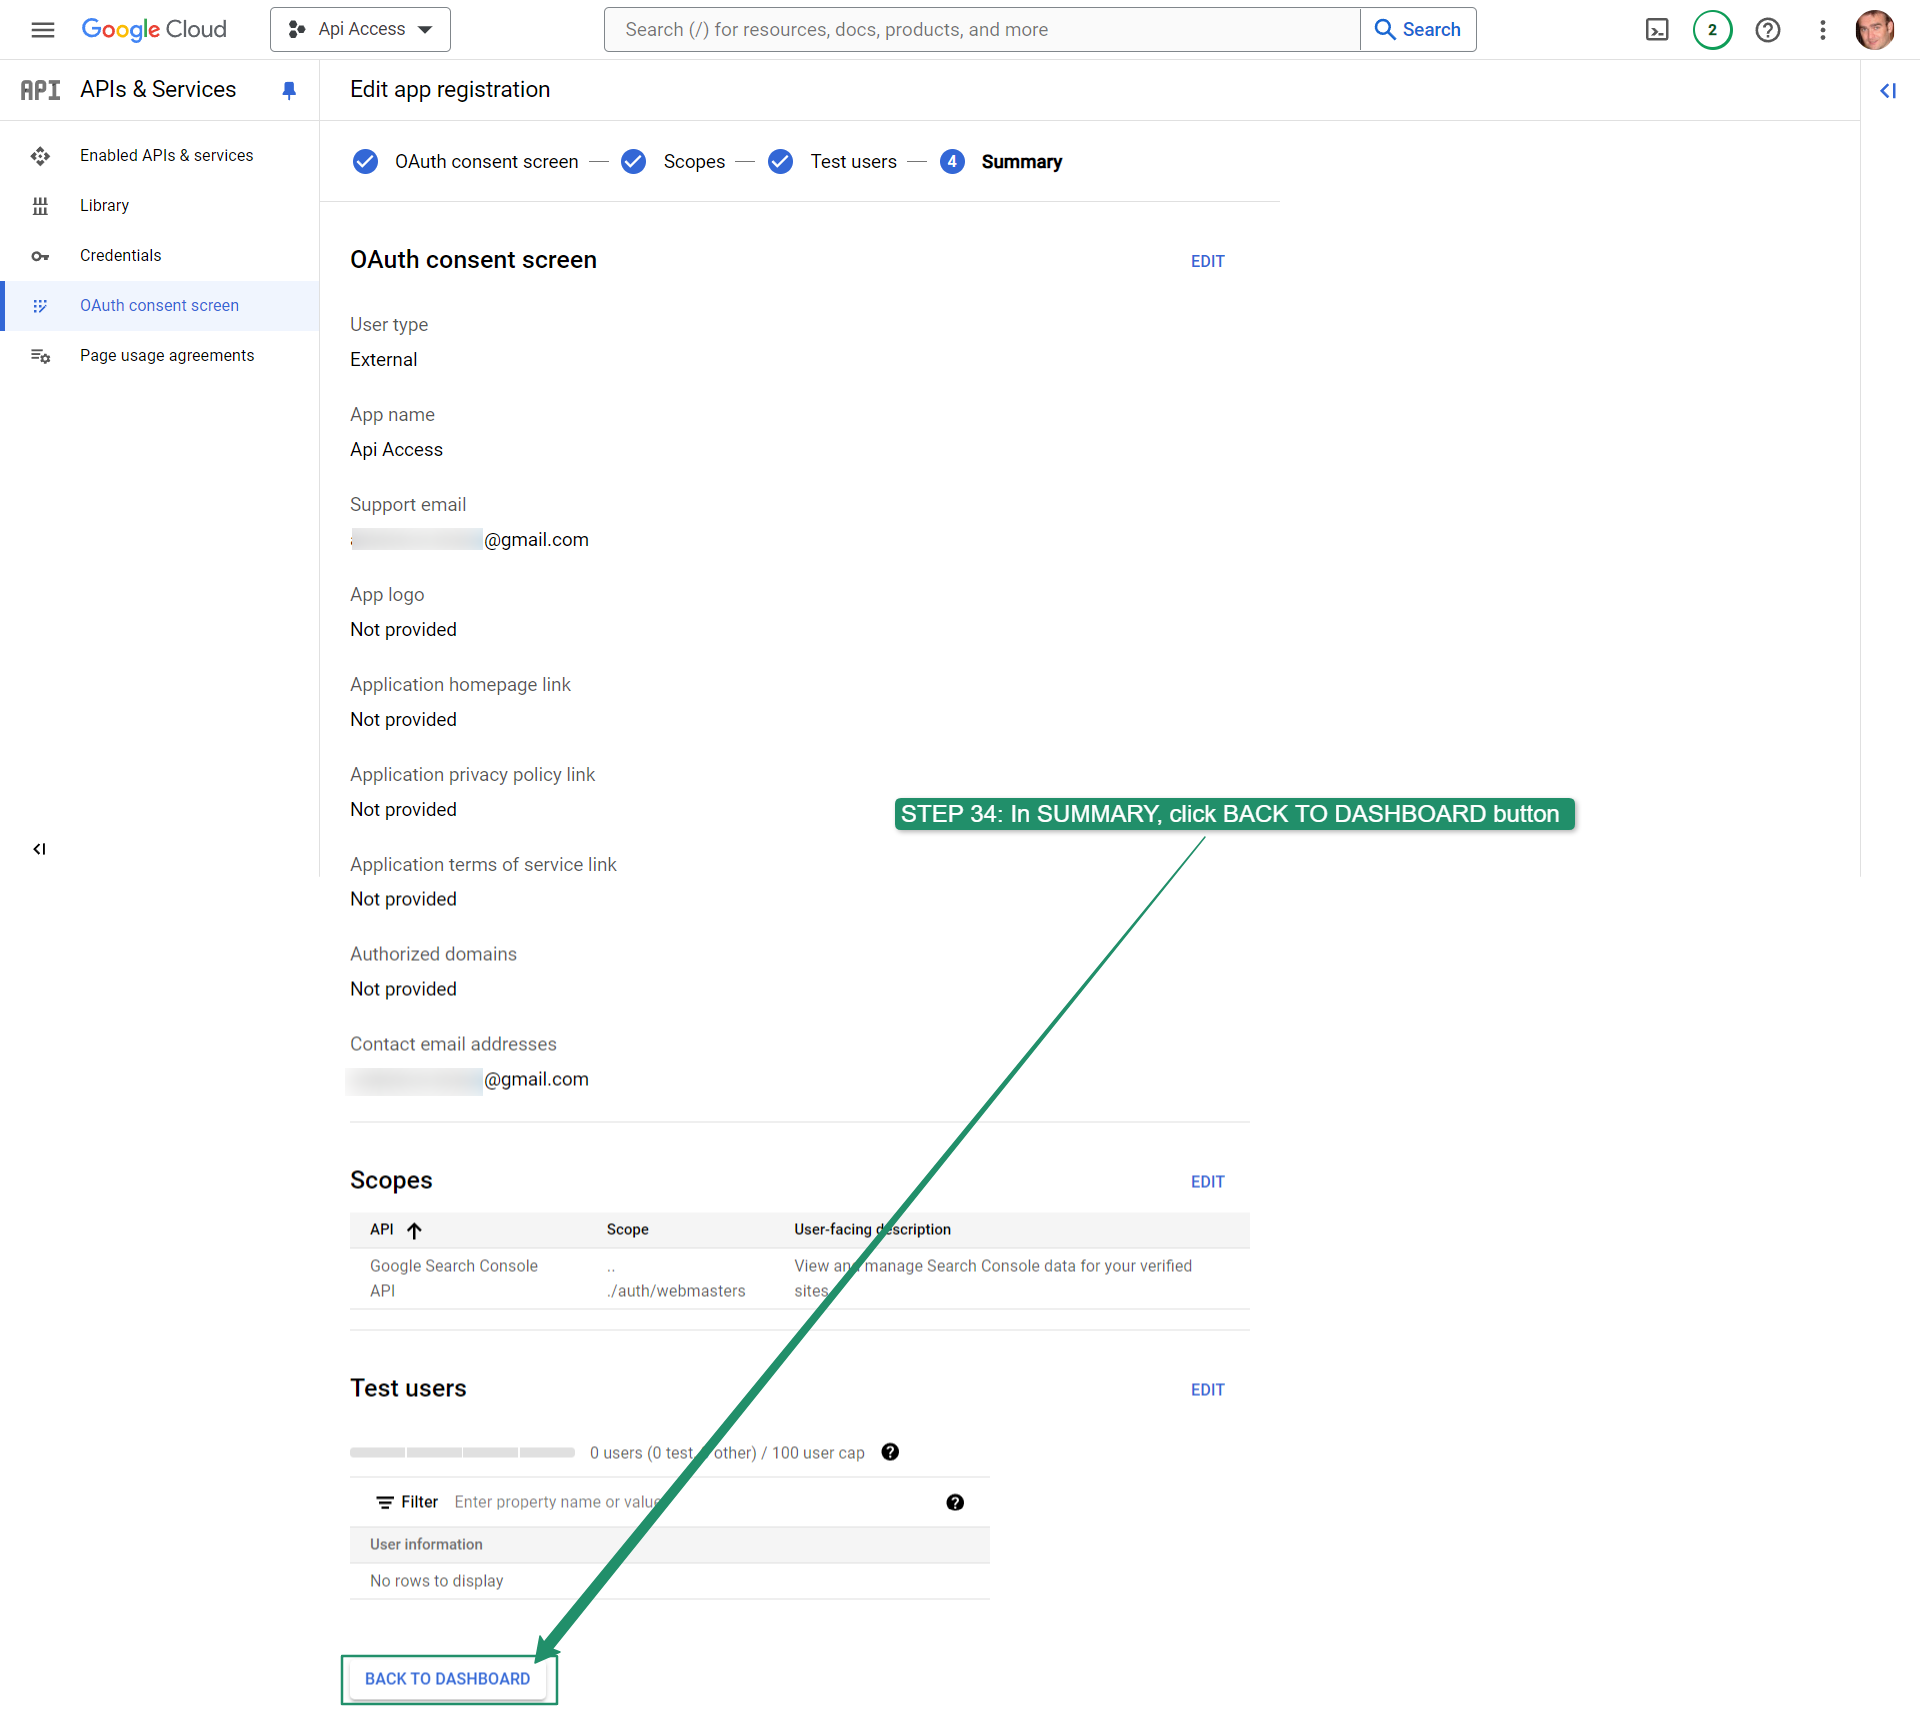
- In Test Users, click SAVE AND CONTINUE.
Step 34
- In SUMMARY, click BACK TO DASHBOARD button
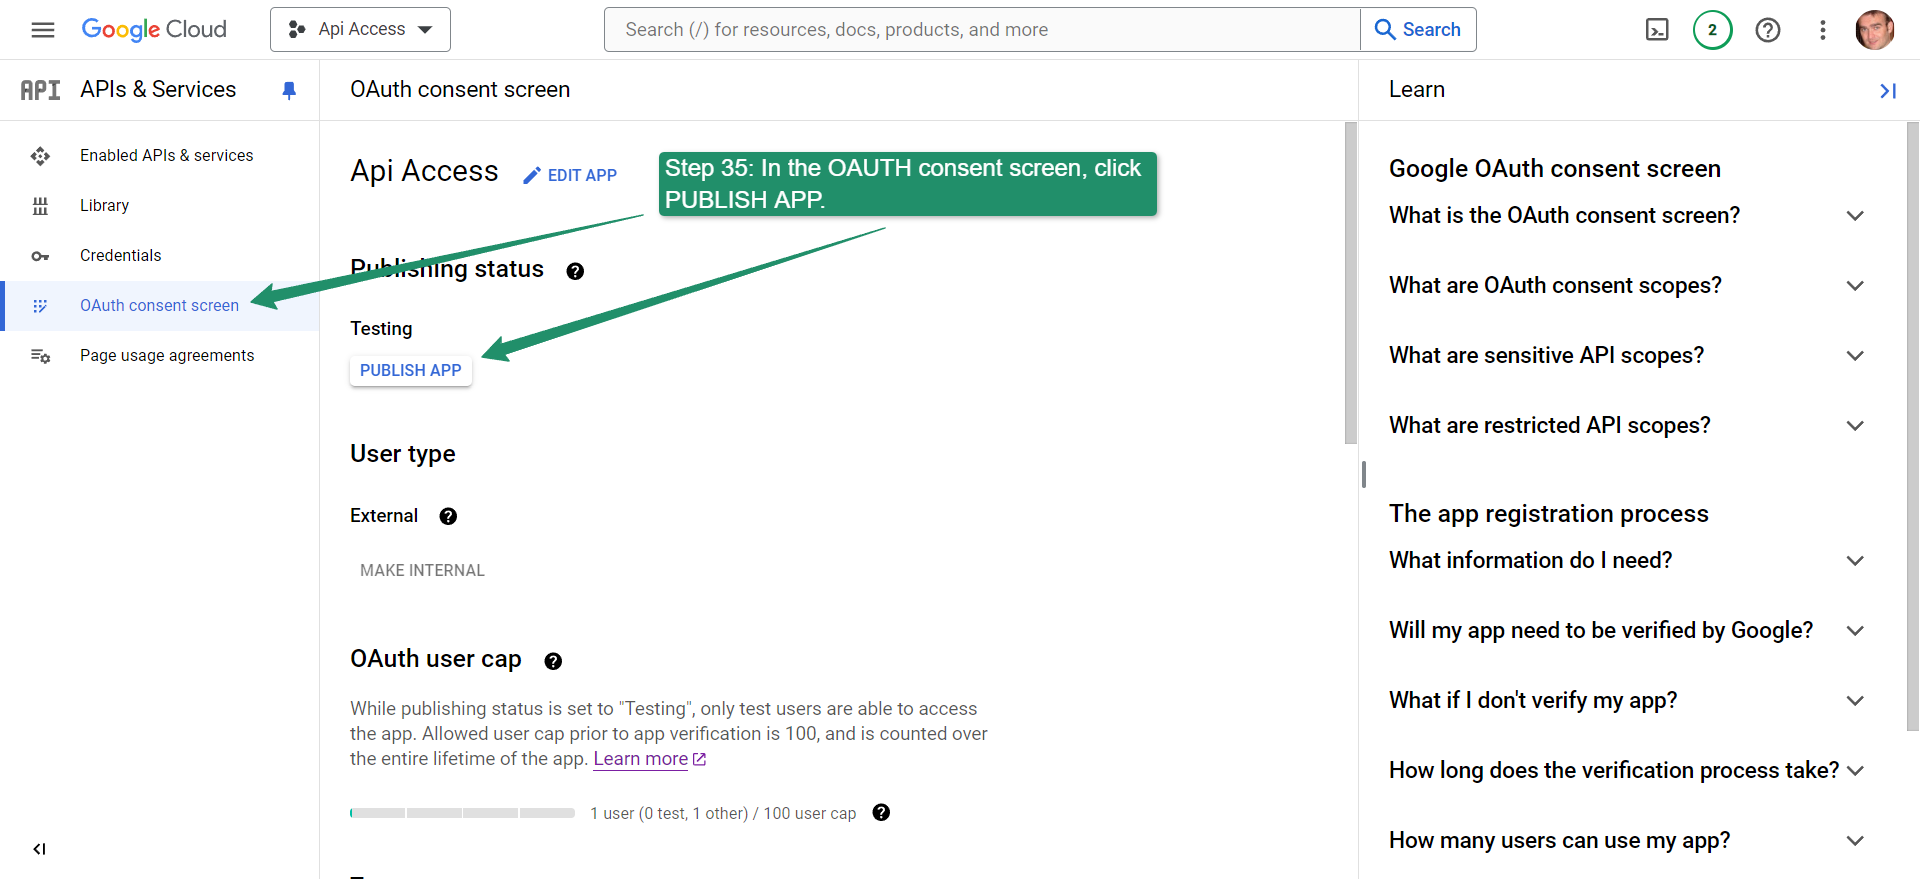
Step 35
- In OAuth consent screen, click “PUBLISH APP” button
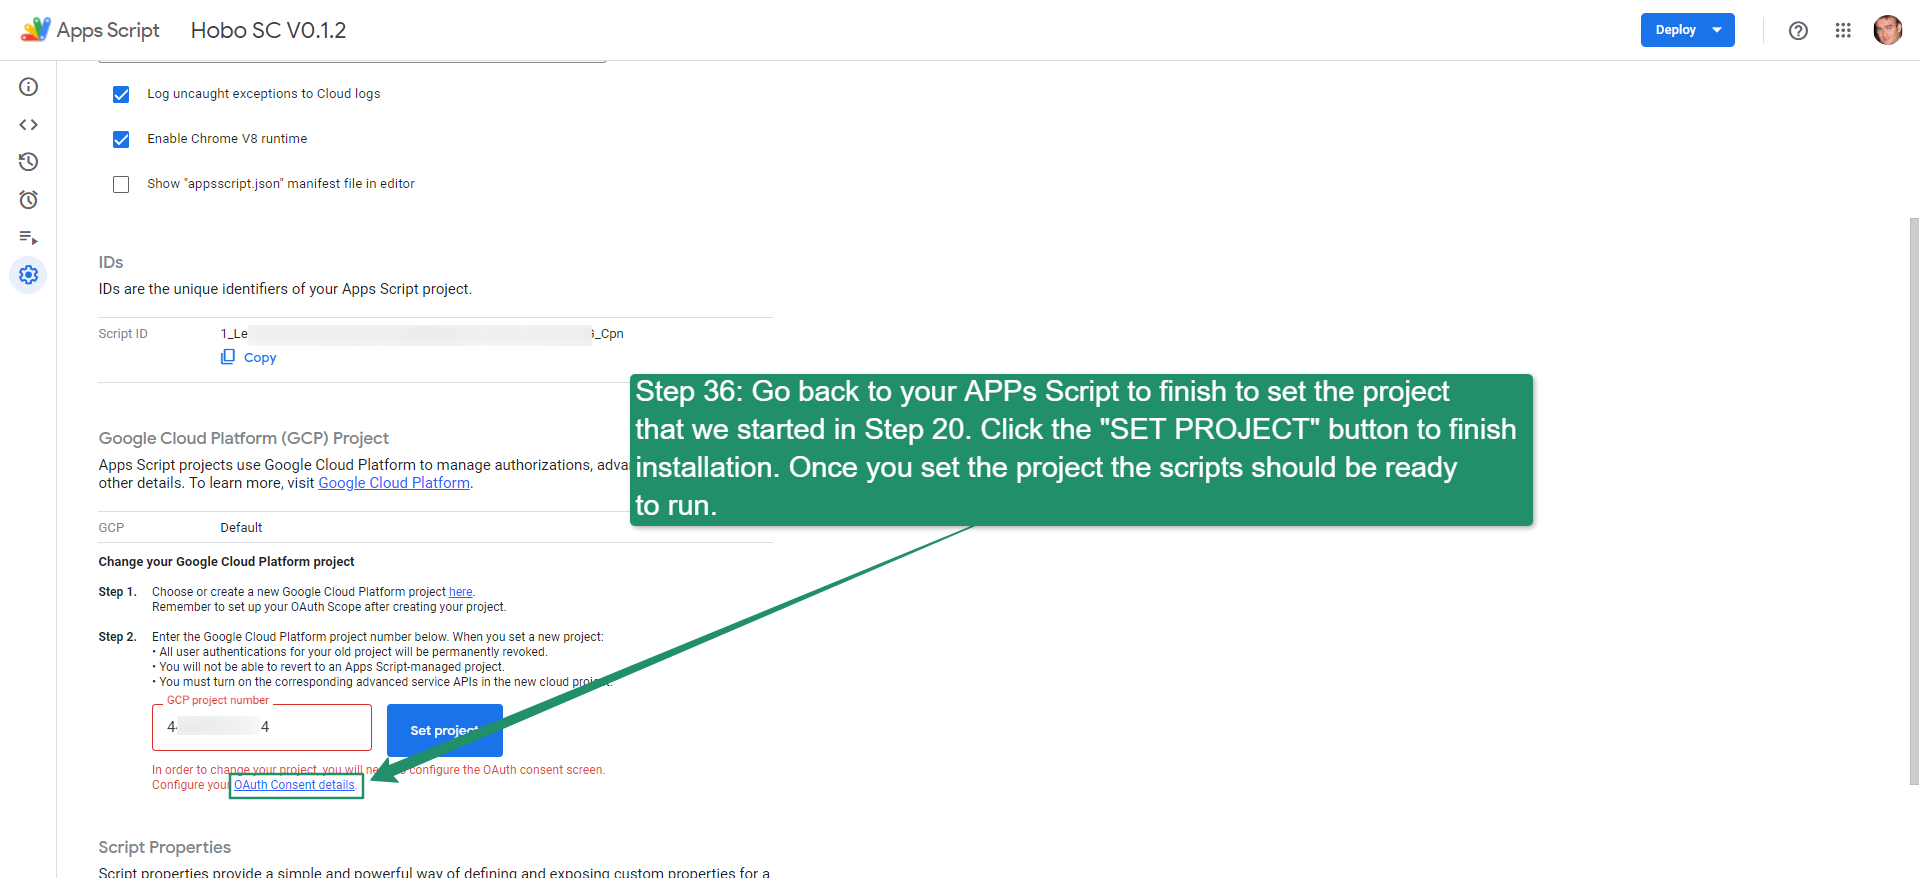
Step 36
- Go back to your APPs Script to finish to set the project that we started in Step 20. Click the “SET PROJECT” button to finish the installation. Once you set the project the scripts should be ready to run.
That should be you set up and good to go.
How to set up Screaming Frog for use in Hobo SEO Dashboard
Screaming Frog is my favourite website development tool. It’s the best website crawler available at the cost, in my opinion, at least.
The tricky part of working with Screaming Frog (which you will have purchased separately) is just managing the files it produces, and prioritising that list in a time-efficient manner.
Hobo SEO Dashboard for Google Sheets (available to buy here) is one Google Sheet, Sheet Template, and App Script Library you have access to, to add to your Screaming Frog workflow to do this exact thing.
When set up to work in concert with a Scheduled Crawl in your previously purchased licensed version of Screaming Frog it will autonomously cycle through loaded clients, load Screaming Frog Files, manage your Google Drive and email you (or your clients) your reports.
During beta testing, I have not run into API costs. It works perfectly on a free Personal Gmail account (tested with about 150 clients) although will work best with a Google Workspace account).
There is no recording of data at the developer’s end (mine).
It is the real deal: a private, simple tidy, managing and reporting script for your managing SEO Audits and website development or migration projects and using Screaming Frog to its full reporting potential.
This uses your API credentials entirely through Google Sheets authorization.
Key benefits
- Time Saver – Identifies your website development priorities in minutes.
- Time Saver – Manages, stores, and collates 20-30 critical Screaming Frog crawl files saved to your Google Drive by Screaming Frog Scheduler (in minutes).
- Time Saver – Tidies your Screaming Frog files in Google Drive, moving used files to the Google Drive trash for 30 days – so restorable, too.
- Time Saver – Loads clients to a schedule you set.
- Time Saver – Built-in checks to check you are sending clients the correct report.
- Organizer – One report sheet is continually updated for the client report. Track your client data on one report sheet. The system creates a new document and continually updates that document for your client so it is one document you ever share with the client that is continuously updated.
- Time Saver – Emails you and your clients (optional) an SEO Audit based on Screaming Frog crawl data of the site to a schedule you set.
- Time Saver – Performs an automatic check against Screaming Frog data (which identifies content indexing issues) and a Hobo Premium SEO Checklist (guidelines laid down in Google’s documentation).
- Secure – Automatic versioning Backup, Sharing, Access Privileges, and Security built-in handled by Google.
- Library Based (App Script).
Hobo SEO Dashboard for Google Sheets, working in concert with Screaming Frog, Google Sheets, Google Drive, and Gmail helps you set up a quick and automatic SEO audit reporting system for multiple websites to a schedule you set.
Key features:
NOTE – I used Ai to generate a feature list directly from the code it analyzed that is behind Hobo SEO Dashboard for Google Sheets, and here it is below:
Hobo SEO Dashboard (Multi-Site) for Google Sheets
Hobo SEO Dashboard for Google Sheets is a tool designed to automate SEO analysis using your Screaming Frog data. It operates directly within Google Drive and Sheets, streamlining the process of identifying SEO issues such as underperforming pages and broken links. This tool is particularly efficient, working within the runtime limits of a personal Gmail account and capable of handling unlimited client sites without incurring high API costs.
By importing a copy of your Screaming Frog crawl outputs, Hobo SEO Dashboard ensures a comprehensive review of your site’s SEO performance. Its automated reporting feature schedules and sends updates directly to you and your clients, saving significant time in manual reporting and analysis. Hobo SEO Dashboard emphasizes efficiency and cost-effectiveness, utilizing caching to minimize operational expenses and focusing on delivering direct, actionable insights to improve your site’s SEO.
It does this by:
- Retrieving and Processing Specific Files from Google Drive – Finds and processes documents from Google Drive for SEO review.
- Identifying Underperforming Pages – Highlights pages lacking engagement to signal performance issues.
- Searching for New Missing Link Errors – Detects recent 404 errors for correction.
- Finding New Server Error Instances – Identifies fresh server (500) errors affecting page display.
- Coordinating SEO Analysis Process – Manages a thorough SEO audit for site visibility improvement.
- Checking for External Broken Links – Documents broken inbound links from other websites.
- Identifying Images Without Descriptions – Finds images missing alt text for SEO and accessibility.
- Scanning for Potential Security Risks – Looks for site vulnerabilities compromising security or trust.
- Looking for Pages Missing Main Headings – Searches for pages without H1 tags, essential for SEO.
- Detecting Errors in Page Numbering Sequence – Corrects sequencing errors in page navigation.
- Identifying Errors in Navigation Links – Fixes navigational link issues for better site usability.
- Looking for Mixed Content Security Issues – Identifies secure/insecure content mix risking security.
- Finding Pages Without Titles – Pinpoints pages missing titles, crucial for search engine listing.
- Checking for Non-Searchable Reference Links – Ensures canonical links are searchable by engines.
- Identifying URL Issues with Spaces – Detects space issues in URLs causing broken links.
- Scanning for Unsecure Forms – Highlights forms with security risks.
- Looking for Mobile Page Linking Issues – Identifies indexing issues with mobile page links.
- Identifying Internal Links with No Response – Finds dead internal links affecting navigation.
- Checking for Unsafe Links Between Websites – Ensures external links are secure.
- Detecting Soft Error Links Within the Site – Identifies internal soft 404 errors.
- Finding Pages with Access Blocked to Content – Searches for pages with blocked content access.
- Identifying Redirects Within the Site – Looks for unnecessary internal redirects.
- Searching for Redirect Chains Within the Site – Identifies and corrects redirect chains.
- Looking for Non-Secure External Links – Checks external links for security issues.
- Analyzing for Nearly Identical Content – Searches for duplicate content affecting SEO.
- Identifying Pages Lacking Incoming Links – Finds pages without internal linking.
- Inspecting for Pagination Issues – Checks for pagination errors affecting indexing.
- Cleans and Organizes Google Drive – Manages space by moving used files to trash.
- Adheres to Personal Gmail Account Limits – Ensures operation within Google’s script runtime limits.
- No Limit on Client Sites Handling – Manages SEO tasks for any number of client sites.
- Schedules and Emails Client Reports – Automates reporting to clients on a schedule.
- Automatically Loads the Next Client – Moves to the next client seamlessly after task completion.
- Runs Reports According to Schedule – Automates report generation and execution.
- Uses the Cache at All Times – Reduces API costs by utilizing caching for data retrieval.
More details to follow.
The Screaming Frog Integration
This is a quick video demonstrating what the Screaming Frog integration does. If you are an experienced SEO or web developer you know organizing and managing all these files can get pretty messy over time and managing them can be an art in itself.
Hobo SEO Dashboard is designed to speed all this up and take something that can take hours and do it in minutes.
Setting Up Screaming Frog
This system is designed to work with exported documents from Screaming Frog, and it should only take you moments to set this up.
When you purchase a Screaming Frog license, you can start to schedule crawls.
When you schedule a crawl, you want to save the exported files to your Google Drive. Screaming Frog Scheduler will format the files as they need to be for use in Hobo SEO Dashboard.
(Note – You can upload Screaming Frog files to your Google Drive manually, even using the free version of Screaming Frog for export files, but make sure you save the format as a Google Sheet specifically if you are hacking it like this. A rule of thumb is the Hobo SEO Dashboard files use GREEN files in your Drive (Google Sheets), not BLUE files, even if they are named the same, possibly with a .csv extension. Just make sure your manual files are saved in Google Sheets format.)
I am currently grabbing screenshots for all this, I will update this later.
Important files to export to Google Drive from Screaming Frog will be the Crawl Overview, Internal_html, and any other files you are interested in.
A full list will be available here shortly.
Note once the Hobo SEO Dashboard system uses a Screaming Frog export file, it moves it to the Drive trash for 30 days, so it won’t be used again in future crawls.
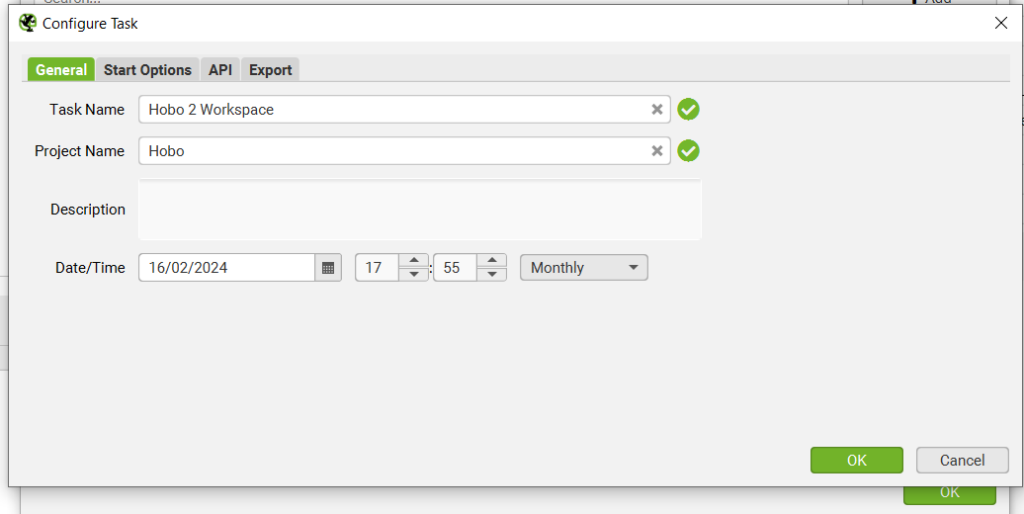
1. Set up a Scheduled Crawl in Screaming Frog
Name your task and Project name whatever you wish, and set up the frequency of your crawls.
1.2 Configure Start Options
Add your website URL and your config file location (you save this in Screaming Frog).
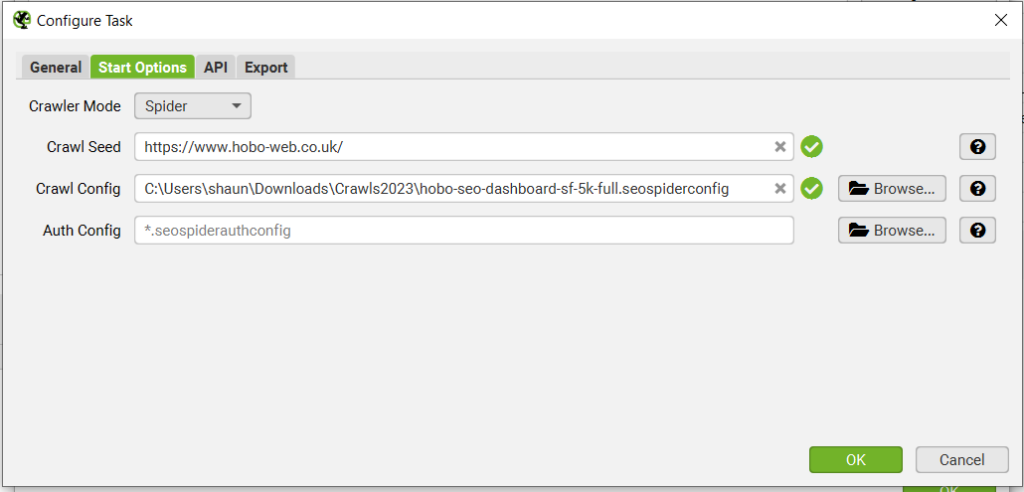
You can save a configuration file in Screaming Frog for any particular client.
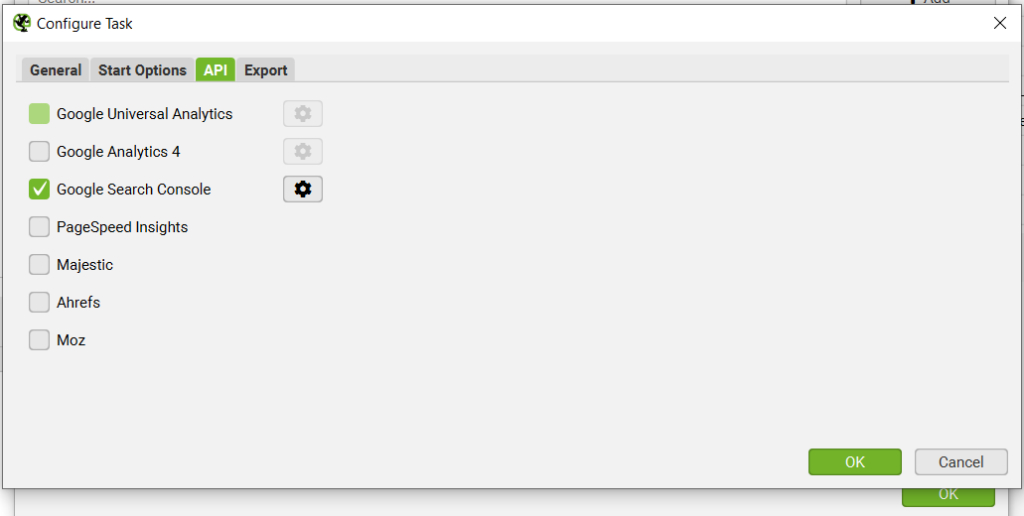
1.3 Set Up API access
Set up API access in Screaming Frog (Hobo SEO Dashboard uses Google Search Console data for now, but will soon also include Analytics).
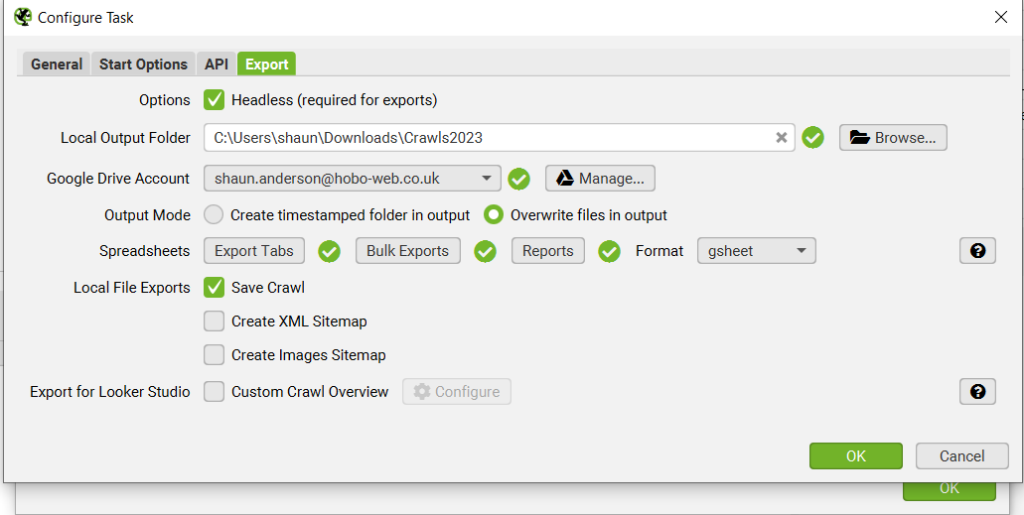
2. Choose export files
Set up export files in Screaming Frog that Hobo SEO Dashboard for Google Sheets uses.
Just copy all my settings in the images:
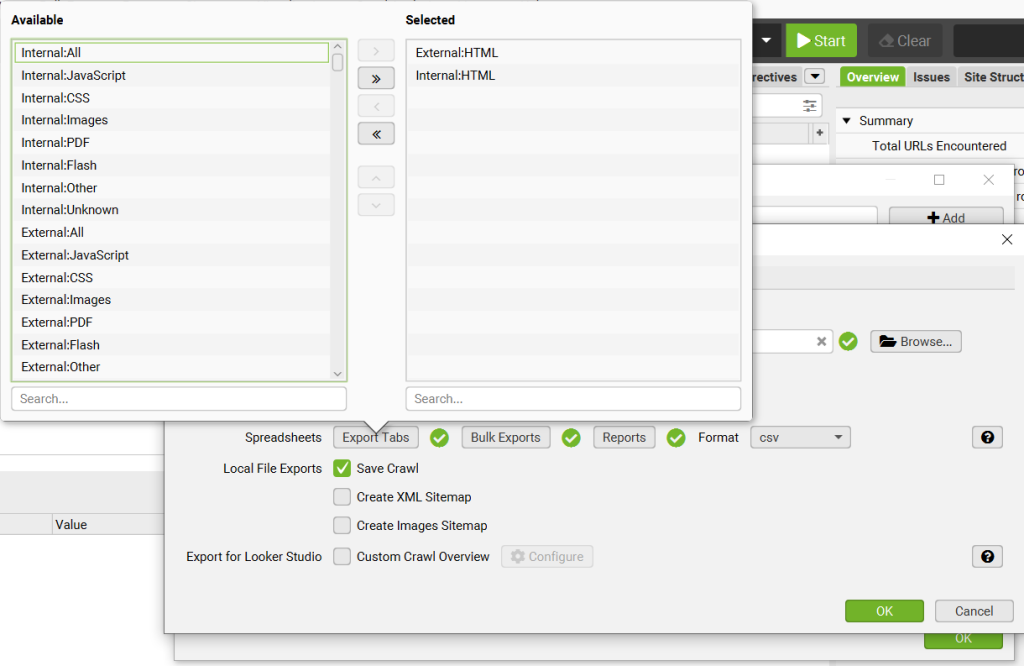
2.1 Choose export tabs
Set up export files in Screaming Frog that Hobo SEO Dashboard for Google Sheets uses.
At the moment Hobo SEO Dashboard uses two Export Tabs:
2.2 Choose Bulk Exports
Set up Bulk Export files in Screaming Frog that Hobo SEO Dashboard for Google Sheets uses.
Hobo SEO Dashboard 3.2 uses the following Bulk Export Reports:
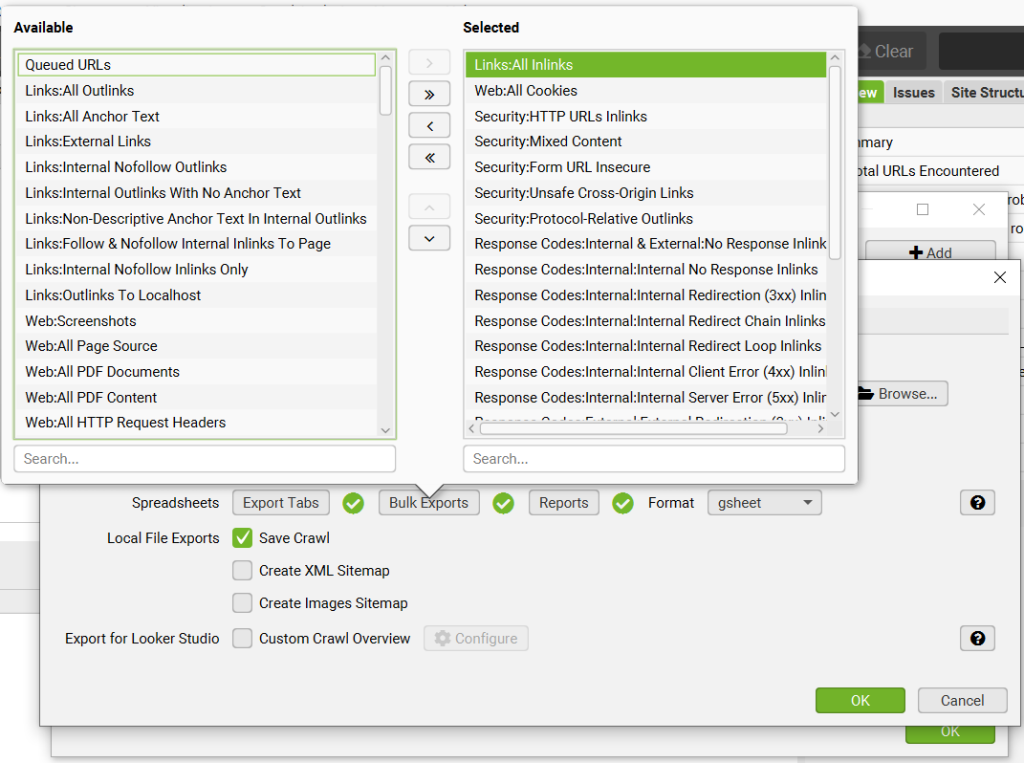
and:
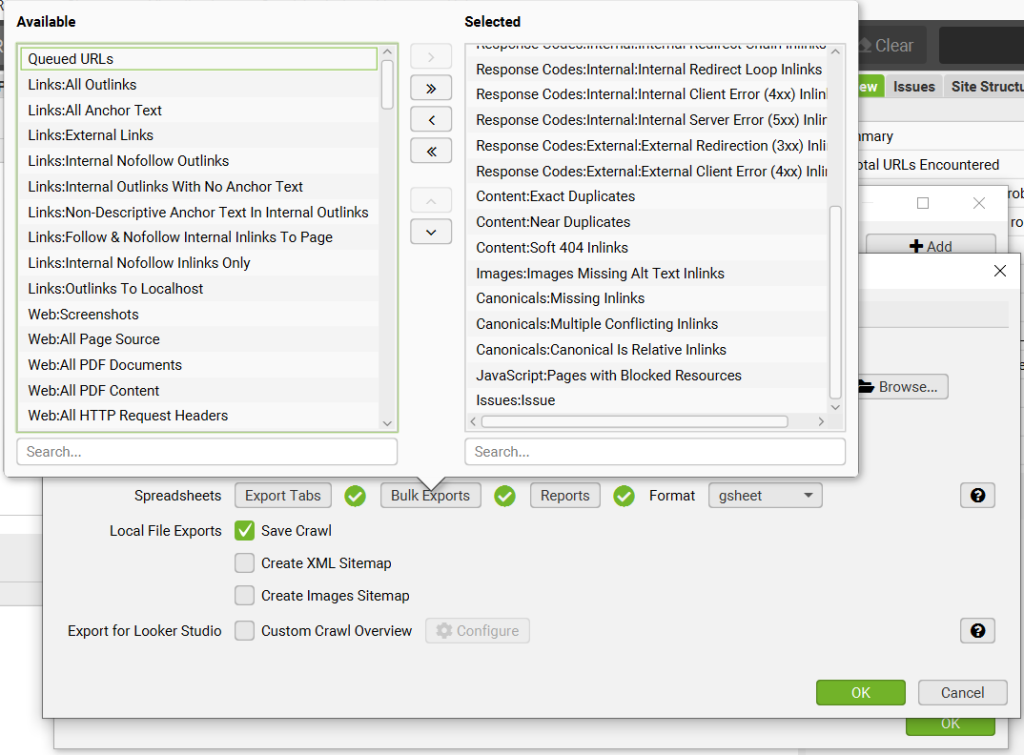
(I’ll clarify the above asap)
2.3 Choose Reports
Set up report files in Screaming Frog that Hobo SEO Dashboard for Google Sheets uses.
Hobo SEO Dashboard for Google Sheets uses the following reports:
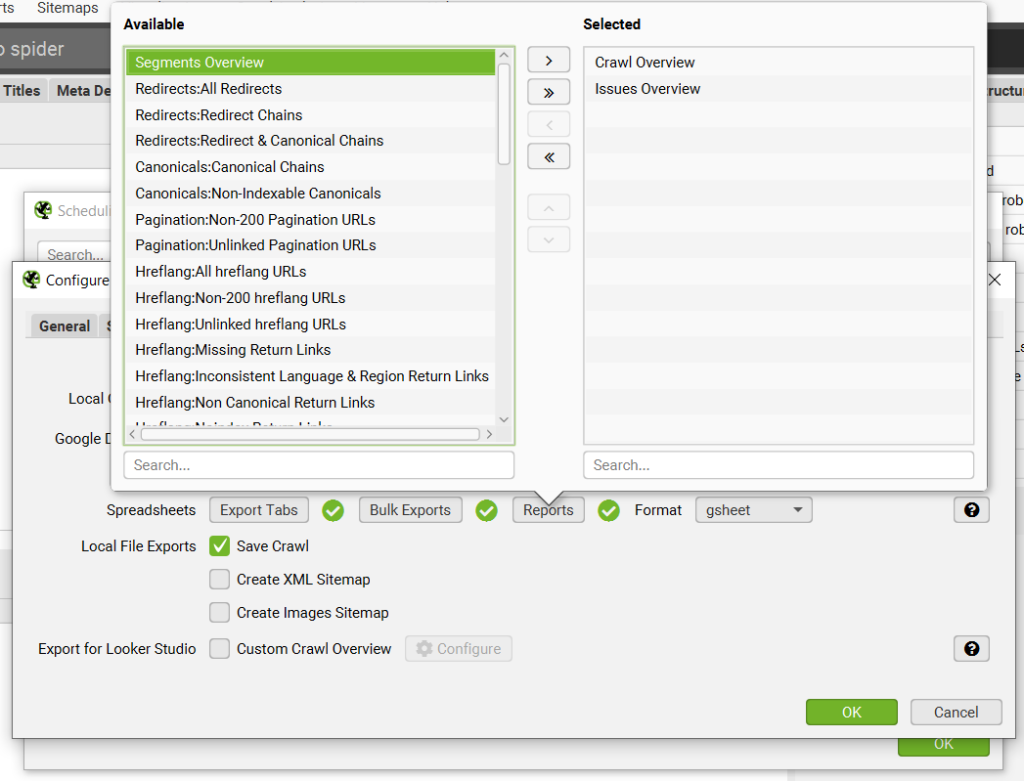
And that’s it.
Make sure you save to Gsheet format and connect Screaming Frog to Google Drive.
Multi-Site Client Website Manager System
I’ve made it as simple and cost-effective as possible to manage an SEO audit process for multiple websites, to a schedule you have full control over.
The system is designed to manage multiple websites and multiple client website data files in your Google Drive folder.
Hobo SEO Dashboard for Google Sheets will run your SEO audits, manage your crawl files, create and develop a central client report, email clients links to the central report and load your next client to process.
You can use your own template with it (and add your own branding).
You can modify the Settings tab to hack reports and change limits on reporting and such.
Once it is set up it IS an autonomous reporter and will run to your schedule.
More Hobo SEO Dashboard Videos coming shortly:
- Performing A Full Manual Audit with this system (Soon)
- How it works underneath the hood so to speak (Soon)
- Code Validation (Third-Party code validation – Soon)
- All of Screaming Frog Reports (In the next major update)
See reactions for Hobo SEO Dashboard for Google Sheets on LinkedIn and Twitter.
This is very much an indie-hacker project, and I’ve built a lot of it in public if you have been following along.
Not affiliated with Screaming Frog, and you will need to purchase a Screaming Frog license to use Hobo SEO Dashboard for Google Sheets.
As an SEO or web developer, it will be the best purchase you’ve made recently.
Hobo SEO Dashboard System Introduction
About Hobo SEO Dashboard
Hobo SEO Dashboard is designed to do one thing; Automate professional SEO audit reporting to make your life easier.
In short, the system works by creating and managing a Clients tab in your main Hobo Google sheet. You manage particular configurations in the Clients tab.
The Clients tab is a visual rotating loader system that shows which client is next on the list.
The client in the Clients tab column B is the client that is loaded into the Settings tab for the reporter to run.
New clients are automatically added to the Clients tab based on crawl files in your Googe Drive, when reporter scheduling is set up, although you can manually add too.
By default, the system will load and process a new client every hour, when Automatic Reporting is setup.
The system creates and shares SEO audit reports based on Screaming Frog data files, check the SEO Audit report in your CLIENT REPORT that the system generates. You edit the CLIENT REPORT for clients, not your Hobo SF SEO Audit tab. You complete the manual review of the client data in the CLIENT REPORT, not the main Hobo SF sheet.
You can also set up regular emailing to schedule email reports the system generates, for instance, every Monday at a certain time.
Once set up, the system will autonomously and automatically update the client report the system originally generated for the client.
It will not overwrite your SEO Audit tab in your Client Report, so go ahead and perform the manual review in any client report the system generates as you will not lose any data in the SEO audit tab.
I work in the background to optimise the libraries the system uses are optimised and improved.
The system is designed to be private and transparent. You will be able to quickly learn how everything works together.
Running this system will not incur further charges to you, from Hobo or Google.
You have a lifetime update too, so do get in touch.
Screaming Frog Integration
The easiest way to set it will be to
- Set up your scheduled crawls in Screaming Frog and save to your Google Drive.
- Navigate to: Hobo Admin > Report Scheduler > Activate Automated Reporting
This will turn the system on.
You can also:
Navigate to the top menu in your Google Sheet: Navigate to: Hobo Admin > Setup > Auto Add Clients from Google Drive.
NOTE: Hobo SEO Dashboard will move used crawl files for the trash for 30 days. It will not delete anything, although trash is deleted after 30 days by Google automatically.
Hobo Controls Menu
In the top menu in Google Sheets at the far right you will see Hobo Controls.
Select this and you will see the dropdown options:
- Select Client
- Navigate to: Hobo Controls > Select Client
- Description: Opens a sidebar where you can select a client from the list.
- Load Next Client
- Navigate to: Hobo Controls > Load Next Client
- Description: Loads the next client in the list and cleans up the previous client’s data.
- Start Reporter
- Navigate to: Hobo Controls > Start Reporter
- Description: Starts the automated SEO reporting process.
- Stop Reporter
- Navigate to: Hobo Controls > Stop Reporter
- Description: Stops the automated SEO reporting process.
- Reset Report
- Navigate to: Hobo Controls > Reset Report
- Description: Resets the report to its initial state.
- How to Reset the Reporter:
- Go to Controls.
- Click on Reset Report.
- This will trigger the function to reset the report and clean up any existing data.
- Dashboard Submenu
- Update Dashboard Search Console Report
- Navigate to: Hobo Controls > Dashboard > Update Dashboard Search Console Report
- Description: Updates the Search Console report in the dashboard.
- Update Dashboard Search Console Report
- Update Dashboard Crawl Report
- Navigate to: Hobo Controls > Dashboard > Update Dashboard Crawl Report
- Description: Updates the Crawl report in the dashboard.
- Crawl Submenu
- Add new SF Client
- Navigate to: Hobo Controls > Dashboard > Crawl > Add new SF Client
- Description: Opens a sidebar to add a new Screaming Frog client.
- Add new SF Client
- Import Crawl Files
- Navigate to: Hobo Controls > Dashboard > Crawl > Import Crawl Files
- Description: Imports crawl files for analysis.
- Get Crawl Schedule
- Navigate to: Hobo Controls > Dashboard > Crawl > Get Crawl Schedule
- Description: Generates a crawl schedule based on the overview data.
- Import File Individually to Tab
- Navigate to: Hobo Controls > Dashboard > Crawl > Import File Individually to Tab
- Description: Contains multiple individual file import options for various crawl analyses.
- Search Console Submenu
- Sync Clients with Search Console (DO THIS AS A FIRST STEP)
- Navigate to: Hobo Controls > Dashboard > Search Console > Sync Clients with Search Console
- Description: Syncs the clients listed with their Search Console data.
- Sync Clients with Search Console (DO THIS AS A FIRST STEP)
- Update Dashboard Report
- Navigate to: Hobo Controls > Dashboard > Search Console > Update Dashboard Report
- Description: Updates the entire dashboard report with fresh data.
- Update Google Algorithm Dates
- Navigate to: Hobo Controls > Dashboard > Search Console > Update Google Algorithm Dates
- Description: Updates the dashboard with the latest Google Algorithm update dates.
Hobo Admin Menu
- Set Admin
- Navigate to: Hobo Admin > Set Admin (DO THIS AS A FIRST STEP)
- Description: Opens a sidebar to set admin information for the reporting process.
- Setup Submenu
- Import Search Console Clients
- Navigate to: Hobo Admin > Setup > Import Search Console Clients
- Description: Initiates the import of clients from Search Console.
- Add new SF Client
- Navigate to: Hobo Admin > Setup > Add new SF Client
- Description: Opens a sidebar to add a new Screaming Frog client.
- Archive Clients
- Navigate to: Hobo Admin > Setup > Archive Clients
- Description: Archives the selected clients.
- Unarchive Clients
- Navigate to: Hobo Admin > Setup > Unarchive Clients
- Description: Unarchives the selected clients.
- Optimise Crawl Reporting
- Navigate to: Hobo Admin > Setup > Optimise Crawl Reporting
- Description: Optimises the crawl reporting process.
- Import Search Console Clients
- Report Scheduler Submenu
- Activate Automated Reporting
- Navigate to: Hobo Admin > Report Scheduler > Activate Automated Reporting
- Description: Activates the automated reporting process.
- Deactivate Automated Reporting
- Navigate to: Hobo Admin > Report Scheduler > Deactivate Automated Reporting
- Description: Deactivates the automated reporting process.
- Activate Automated Reporting
- Client Report Submenu
- Update Client Report
- Navigate to: Hobo Admin > Client Report > Update Client Report
- Description: Updates the client report with fresh data.
- Publish Client Report
- Navigate to: Hobo Admin > Client Report > Publish Client Report
- Description: Publishes the client report.
- Prepare Email To Client
- Navigate to: Hobo Admin > Client Report > Prepare Email To Client
- Description: Opens the email client sidebar to prepare an email to the client.
- Update Client Report
- Clients Submenu
- Create Multi-Site Client Reporter
- Navigate to: Hobo Admin > Clients > Create Multi-Site Client Reporter
- Description: Creates a multi-site client reporter and cleans rows.
- Confirm Bulk Sharing Settings
- Navigate to: Hobo Admin > Clients > Confirm Bulk Sharing Settings
- Description: Confirms the bulk sharing settings for the clients.
- Bulk Email Client Reports
- Navigate to: Hobo Admin > Clients > Bulk Email Client Reports
- Description: Sends regular email updates to clients on a schedule.
- Schedule Regular Emails
- Activate Automated Emailing
- Navigate to: Hobo Admin > Clients > Schedule Regular Emails > Activate Automated Emailing
- Description: Activates automated emailing of client reports.
- Deactivate Automated Emailing
- Navigate to: Hobo Admin > Clients > Schedule Regular Emails > Deactivate Automated Emailing
- Description: Deactivates automated emailing of client reports.
- Activate Automated Emailing
- Create Multi-Site Client Reporter
- Projects Submenu
- Winners and Losers URLs
- Activate URLs Winners and Losers project
- Navigate to: Hobo Admin > Projects > Winners and Losers Urls > Activate Urls Winners and Losers project
- Description: Activates the URLs Winners and Losers project.
- Deactivate URLs Winners and Losers project
- Navigate to: Hobo Admin > Projects > Winners and Losers Urls > Deactivate Urls Winners and Losers project
- Description: Deactivates the URLs Winners and Losers project.
- Activate URLs Winners and Losers project
- Winners and Losers Keywords
- Activate Keywords Winners and Losers project
- Navigate to: Hobo Admin > Projects > Winners and Losers Keywords > Activate Keywords Winners and Losers project
- Description: Activates the Keywords Winners and Losers project.
- Deactivate Keywords Winners and Losers project
- Navigate to: Hobo Admin > Projects > Winners and Losers Keywords > Deactivate Keywords Winners and Losers project
- Description: Deactivates the Keywords Winners and Losers project.
- Activate Keywords Winners and Losers project
- Winners and Losers URLs
- Training Module
- Navigate to: Hobo Admin > Training Module
- Description: Opens the Training Module sidebar that contains training materials and guides for users. ((Your are here now)
Chapter 1: Client Email System on Hobo SEO Dashboard
Introduction
The Client Email System is an integral part of the Hobo SEO reporting and auditing system, utilized within Hobo SEO Dashboard, Hobo SF, and Hobo SC. It automates the process of generating client reports, sharing documents, and sending bulk emails based on specified criteria. The script retrieves and organizes client data, filters out unnecessary entries, applies sharing settings, and ensures timely email communication. This tool is perfect for businesses and organizations that need to manage large volumes of client data and maintain regular, personalized communication with their clients without the manual effort.
By automating these tasks, the script helps you efficiently manage client data, ensuring timely and accurate email communication, maintaining up-to-date sharing settings for client reports, and saving you valuable time.
Detailed Breakdown
1. Create and Clean the Client Reporter Tab
- Purpose: Gather and organize client data for reporting.
- Actions:
- Retrieve crucial client data from the “Clients” sheet, including names, email addresses, report links, report statuses, and administrative details.
- Organize this data into a comprehensive client report.
- Filter out clients based on specific criteria:
- Missing Email Addresses: Clients with missing or invalid email addresses.
- Missing Reports: Clients with missing or invalid reports to share.
- Recently Emailed: Clients who have already been emailed recently, as per the schedule set in the “Clients” tab.
- Menu Path: To create and clean the Client Reporter tab, use Hobo Admin > Client Bulk Mailer > Create Multi-Site Client Reporter.
2. Apply Sharing Settings to Documents
- Purpose: Ensure clients have appropriate access to their reports.
- Actions:
- Retrieve the document IDs and corresponding client email addresses from the “Client Reporter” tab.
- Ensure each client report is shared with the appropriate clients, granting them the correct access permissions (e.g., view or edit).
- Add clients as editors to the documents if they are not already included, making sure they have access to their reports.
- Log the sharing actions and notify about any changes made, keeping you informed of the process.
- Menu Path: To apply sharing settings, use Hobo Admin > Client Bulk Mailer > Confirm Bulk Sharing Settings.
3. Send Bulk Emails
- Purpose: Communicate with clients by sending personalized reports.
- Actions:
- Retrieve detailed client information from the “Client Reporter” tab, including names, recipient emails, report links, personalized messages, and additional details.
- Send personalized emails to clients with the latest reports attached or linked, ensuring each email is tailored to the recipient.
- Include salutations, detailed messages, and proper sign-offs to maintain a professional and personal touch.
- Log the date and time each email is sent, providing a record of your communications.
- Menu Path: To send bulk emails, use Hobo Admin > Client Bulk Mailer > Bulk Email Client Reports.
4. Hide the Client Reporter Tab
- Purpose: Maintain a clean and organized spreadsheet interface.
- Actions:
- Hide the client report after the email process is completed.
- Display a notification confirming that the action has been taken.
- Menu Path: This action is typically automated within the script and doesn’t require a direct menu action.
5. Set Up Automations and Schedules
- Purpose: Automate the regular update process to ensure consistency and email clients according to the schedule you set.
- Actions:
- Clear any existing triggers that might cause conflicts.
- Set up new triggers based on your specified settings, such as the day of the week and time, so the process runs automatically at your preferred schedule.
- Automate the email update process to run regularly without needing manual intervention, saving you time and ensuring consistency.
- Menu Path: To set up automations and schedules, use Hobo Admin > Client Bulk Mailer > Schedule Regular Emails > Activate Automated Emailing.
Chapter 2: Client Loading System on Hobo SEO Dashboard
Introduction
The Client Loading System is a vital component of the Hobo SEO reporting and auditing system, used within Hobo SEO Dashboard, Hobo SF, and Hobo SC. It automates the process of loading client data, synchronizing data between sheets, and preparing the system for report generation. This script ensures efficient client data management, checks if a report is due, and optimizes settings for accurate report generation. By default, it is set to process a client every hour to save API usage.
By automating these tasks, the script helps you maintain organized client data, avoid manual errors, and ensure timely report generation, saving you valuable time and effort.
Detailed Breakdown
1. Initial Setup and Checks
- Purpose: Perform initial setup and check conditions to proceed.
- Actions:
- Remove any client with ID 0 from the “Clients” sheet.
- Retrieve the domain name from the “Settings” sheet.
- Check if the process should be paused based on the value in cell B267.
- Continuously check cell B241 for the “WAITING” status and handle accordingly.
- Ensure the reporter is running by checking cell B242.
- Menu Path: To start the client loading process, use Hobo Controls > Load Next Client.
2. Load Client Data and Synchronize Sheets
- Purpose: Load and synchronize client data between sheets.
- Actions:
- Retrieve the initial status from cell B243 in the “Clients” sheet.
- If the client is not due a report, skip to the next client.
- Synchronize client data from the “Clients” sheet to the “Settings” sheet.
- Check and handle specific conditions in cells B246 and B253.
- Update the last runtime in cell B264 of the “Settings” sheet.
- Menu Path: To sync clients with Search Console, use Hobo Admin > Setup > Import Search Console Clients.
3. Generate Reports
- Purpose: Generate reports for clients.
- Actions:
- If a report is due, initiate the report generation process.
- Ensure the generated reports are accurate and timely.
- Log the date and time each report is generated, providing a record of your communications.
- Menu Path: This action is typically automated within the script and doesn’t require a direct menu action.
4. Cleanup and Optimization
- Purpose: Maintain a clean and optimized spreadsheet environment.
- Actions:
- Clear contents from specific tabs and ensure they have a consistent number of rows.
- Trigger cleanup processes and optimize settings for accurate report generation.
- Menu Path: To reset the report and perform cleanup, use Hobo Controls > Reset Report.
Chapter 3: Populating the “Clients” Tab: Methods and Processes
Introduction
The “Clients” tab in your Google Sheets SEO Dashboard can be populated and updated through several methods to ensure that all client data is accurate and up-to-date. This includes manual form submissions and automated synchronization with Google Search Console.
Methods for Populating the “Clients” Tab
1. Admin Form Submission
- Purpose: To manually add or update client information via an admin interface.
- Process:
- The admin fills out the form with client details such as name, email, report schedule, and other relevant information.
- Upon submission, the form data is mirrored to the “Clients” tab, ensuring the data is centralized and easily accessible.
- Access this feature via the menu: Hobo Admin > Setup > Set Admin.
- This method is useful for initial setup and manual updates.
2. Screaming Frog (SF) Form Submission
- Purpose: To add clients specifically for Screaming Frog (SF) data collection when Search Console access is not available.
- Process:
- The SF form collects information relevant to Screaming Frog clients.
- On submission, the data is automatically added to the “Clients” tab.
- Access this feature via the menu: Hobo Admin > Setup > Add new SF Client.
- This method is ideal for clients who primarily require crawling and site analysis services.
3. Manual Entry
- Purpose: To allow direct input of client data into the “Clients” tab.
- Process:
- Users can manually enter client details directly into the “Clients” tab within the Google Sheet.
- This method is straightforward and useful for quick updates or additions.
Automated Population via Search Console Scripts
Purpose
To automate the addition and updating of client data using information from Google Search Console, ensuring continuous synchronization.
Process
Client Synchronization
- Sync Clients with Search Console: This script automatically syncs the clients listed in the Search Console with the “Clients” tab.
- Access this feature via the menu: Hobo Admin > Setup > Import Search Console Clients.
- Scheduled Updates: Scripts run at regular intervals to ensure the “Clients” tab is continuously updated with the latest data from the Search Console.
Data Extraction and Writing
- Initial Extraction: During setup, the script extracts relevant client data from the Search Console and populates the “Clients” tab.
- Ongoing Updates: At scheduled times, the script updates any changes or new clients found in the Search Console, reflecting these updates in the “Clients” tab.
Processes Involved
Selecting the Canonical Domain
- During the extraction process, the script identifies and selects the canonical domain for each client. This ensures that data is accurately attributed to the primary version of the site, avoiding duplicate or redundant entries.
Cleaning Invalid Sites
- The script includes a validation step to filter out invalid or inactive sites. This involves checking each site’s status and removing any that do not meet the criteria for valid Search Console data.
Handling Multiple Properties
- If a client has multiple properties listed in the Search Console, the script consolidates these into a single entry, ensuring that the “Clients” tab reflects a comprehensive view of each client’s web properties.
Error Handling and Logging
- The script includes robust error handling to manage any issues that arise during the data extraction process. Errors are logged, and notifications are provided to ensure that any problems can be quickly addressed.
Outcome
Automated synchronization ensures that client data from Google Search Console is always current, reducing the need for manual updates and providing reliable, up-to-date information.
Summary
By leveraging both manual and automated methods, the “Clients” tab is efficiently populated and maintained, ensuring accurate and comprehensive client data management. This multi-faceted approach includes:
- Admin Form Submission for detailed, manual entries.
- Screaming Frog Form Submission for clients focused on site crawls.
- Manual Entry for quick, direct updates.
- Automated Population via Search Console Scripts for continuous synchronization, including processes for selecting the canonical domain, cleaning invalid sites, and handling multiple properties.
These methods collectively ensure that your SEO Dashboard is always equipped with the latest client information, enhancing the efficiency and accuracy of your reporting and analysis processes.
Chapter 4: Hobo Premium SEO Checklist Integration
Overview
The Hobo Premium SEO Checklist seamlessly integrates data from Screaming Frog, Google Webmaster Guidelines, Google Search Console, Google Analytics, website testing findings, and quality reviews. This integration organizes the data into actionable SEO priorities, providing you with a comprehensive roadmap to improve your site’s SEO performance.
Using this intelligent system as the core, an SEO audit is automatically generated and copied over to the Client Report by the system. This automated process ensures that the most critical SEO issues are highlighted and prioritized for optimization.
Once the system generates the Client Report, a manual review is conducted to ensure accuracy and comprehensiveness. This final review step ensures that the report provides detailed, prioritized recommendations tailored to improve your website’s search engine visibility effectively.
Chapter 5: Screaming Frog Integration
Overview
The integration of Screaming Frog with Google Sheets allows for a detailed SEO analysis and reporting system. The Screaming Frog SEO Spider tool crawls websites and exports the data, which is then imported into Google Sheets for further analysis. This chapter details the processes and scripts involved in importing Screaming Frog data, setting up relevant tabs, and using the data for SEO reporting.
Tabs Generated
Based on the scripts reviewed, the following tabs are relevant for Screaming Frog data integration:
Crawl Overview
- Purpose: Provides a high-level summary of the crawl results.
- Contents: Total pages crawled, key issues detected, and other summary metrics.
Priorities
- Purpose: Lists SEO priorities based on the crawl data.
- Contents: SEO issues categorized by priority, estimated time to fix, and potential impact.
Reviewed
- Purpose: Contains reviewed SEO priorities.
- Contents: Similar to the Priorities tab but for issues that have been reviewed and assessed.
Crawl Dashboard
- Purpose: A comprehensive dashboard summarizing the crawl data.
- Contents: High-level metrics and summaries of crawl issues and SEO priorities.
404s
- Purpose: Lists pages that return 404 errors.
- Contents: Details about each 404 error, including the URL and referring page.
Security Issues
- Purpose: Identifies pages with security issues.
- Contents: Information about each security issue, including the affected URL and type of issue.
Script Review and Integration
Data Import and Processing
The following scripts are responsible for importing Screaming Frog data and processing it into the relevant tabs.
Importing Screaming Frog Data
This script reads CSV files from a designated Google Drive folder, creates corresponding sheets in Google Sheets, and populates them with the data.
Common System Operations
Sequential Execution
- Purpose: Ensure a smooth and orderly process.
- Actions:
- Perform each step in sequence with necessary pauses to ensure proper execution and avoid conflicts. This ensures that each part of the process completes correctly before moving on to the next.
- Menu Path: This action is typically automated within the script and doesn’t require a direct menu action.
Logging and Notifications
- Purpose: Maintain transparency and keep users informed.
- Actions:
- Log each step of the process to maintain a detailed record of actions taken. This helps in troubleshooting and ensures transparency.
- Display notifications throughout the process to keep you informed of the current status and any issues encountered.
- Menu Path: This action is typically automated within the script and doesn’t require a direct menu action.
Error Handling
- Purpose: Ensure smooth operation and manage issues effectively.
- Actions:
- Manage missing data and errors gracefully. If any issues arise, the system will handle them appropriately and continue running where possible.
- Provide clear error messages and logging for troubleshooting, making it easier to identify and fix any problems that might occur.
- Menu Path: This action is typically automated within the script and doesn’t require a direct menu action.
More details to follow soon!